How do I Configure Credential Guard in Windows 11 Pro?
Credential Guard is a security feature in Windows 11 Pro designed to help protect sensitive information, such as user credentials, from theft by isolating them in a secure environment. Configuring Credential Guard can add a vital layer of protection, especially for devices that access corporate resources or sensitive data. Here’s a step-by-step guide on how to enable and configure Credential Guard in Windows 11 Pro.
Step 1: Verify System Requirements
Credential Guard is available on Windows 11 Pro but requires specific hardware features, including virtualization extensions. Check that your device has:
- UEFI firmware with Secure Boot enabled.
- Hardware virtualization support (found in most modern processors).
- TPM (Trusted Platform Module) 2.0.
Ensure these settings are enabled in your BIOS or UEFI firmware.
Step 2: Enable Virtualization-Based Security (VBS)
Credential Guard relies on Virtualization-Based Security to function, so it needs to be enabled first:
- Open Settings > Update & Security > Windows Security.
- Go to Device Security > Core Isolation Details.
- Enable Memory Integrity if it’s not already activated, which supports the VBS necessary for Credential Guard.
Step 3: Configure Credential Guard Using Group Policy
Credential Guard can be enabled via Group Policy on Windows 11 Pro:
- Press Win + R, type
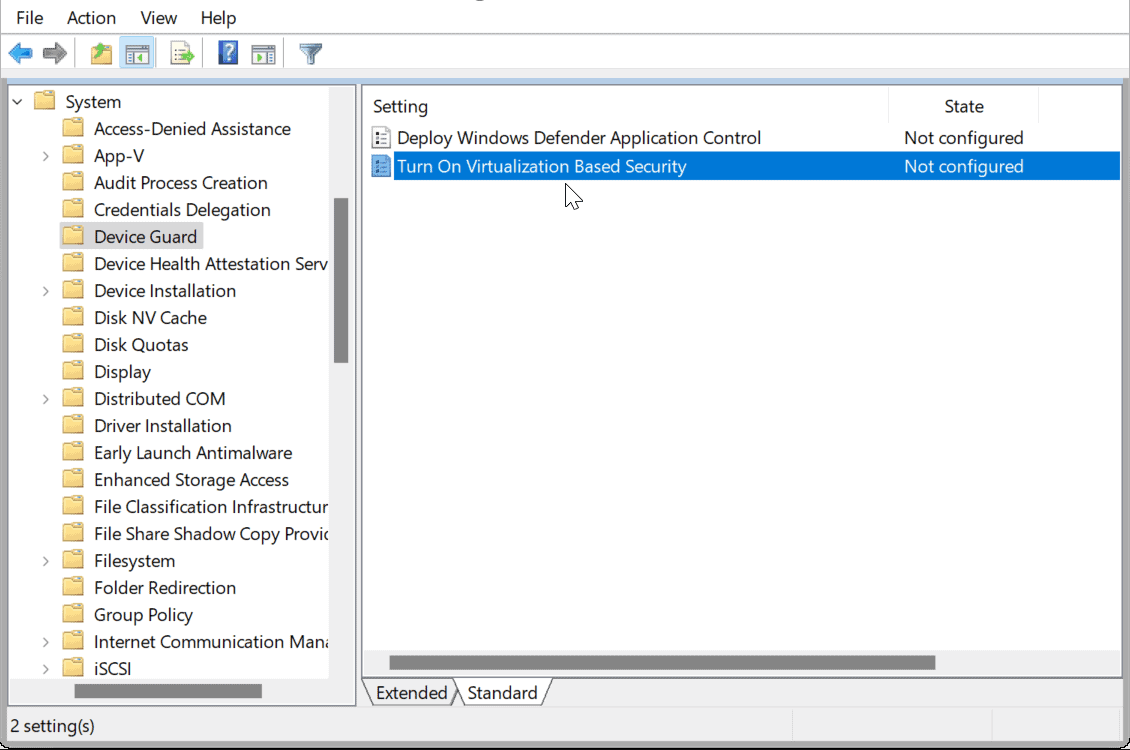
gpedit.msc, and hit Enter to open the Group Policy Editor. - Navigate to Computer Configuration > Administrative Templates > System > Device Guard.
- Double-click on Turn On Virtualization Based Security.
- Set it to Enabled. Under Credential Guard Configuration, select either:
- Enabled with UEFI Lock (recommended for full protection but irreversible without reinstalling the OS) or
- Enabled without Lock if you might need to disable it later.
- Click OK to apply settings.

Step 4: Enable Credential Guard Using Registry Editor (Alternative Method)
Alternatively, you can enable Credential Guard through the Registry Editor:
- Press Win + R, type
regedit, and hit Enter. - Go to
HKEY_LOCAL_MACHINE\SYSTEM\CurrentControlSet\Control\DeviceGuard. - Right-click, select New > DWORD (32-bit) Value, name it
EnableVirtualizationBasedSecurity, and set the value to 1. - Navigate to
HKEY_LOCAL_MACHINE\SYSTEM\CurrentControlSet\Control\Lsa. - Create a new DWORD, name it
LsaCfgFlags, and set its value to 1 for Credential Guard enabled or 2 if UEFI lock is also needed.
Step 5: Restart Your Device
Once you have configured Credential Guard, restart your computer for the settings to take effect. Upon reboot, Credential Guard should be active, securing your credentials from malicious attacks.
Step 6: Verify Credential Guard Status
To check if Credential Guard is running:
- Open System Information by typing “System Information” in the Windows search bar.
- Go to System Summary > Device Guard. Here, you should see Credential Guard listed as Running if configured correctly.
Get the best deal on a genuine Windows 11 Pro Key – unlock powerful features at the lowest price today!


