In today’s digital age, online privacy and security are becoming increasingly important. One way to enhance online security is by using a Virtual Private Network (VPN) to protect your internet traffic and keep your personal information safe from prying eyes. Setting up a VPN in Windows 10 can seem like a daunting task, but it’s a straightforward process that anyone can follow. In this article, we will guide you through the easy steps to set up a VPN in Windows 10, allowing you to browse the web with peace of mind.
A VPN encrypts your internet connection and routes it through a secure server, providing you with an additional layer of protection for your online activities. By encrypting your online traffic, a VPN makes it impossible for anyone to intercept and snoop on your sensitive information as it travels through the internet. Fortunately, setting up a VPN in Windows 10 is relatively easy and requires only a few simple steps. With our easy-to-follow guide, you can set up a VPN in Windows 10 without any technical expertise, giving you the assurance that your online activities remain secure and confidential. Let’s get started with setting up a VPN in Windows 10.
Step 1: Open the VPN settings
- Click on the Start menu and select “Settings” (the cogwheel icon).
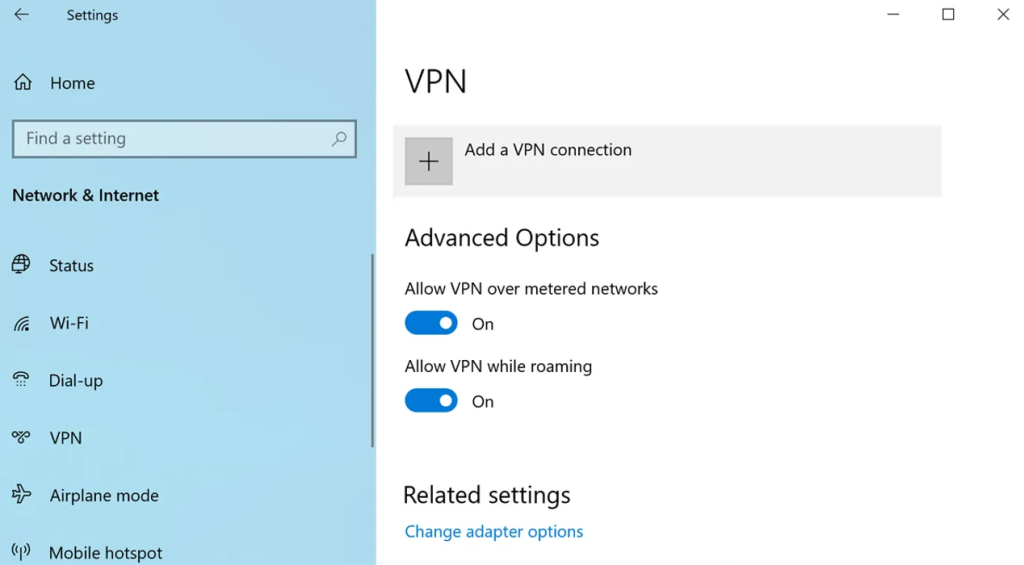
- In the Settings window, click on “Network & Internet.”
Step 2: Add a VPN connection
- In the Network & Internet settings, click on “VPN” from the left-hand menu.
- Next, click on “Add a VPN connection” option.

Step 3: Enter VPN connection details
- Provide the connection details:
- For “VPN provider,” select the preferred VPN service or choose “Windows (built-in)” if you have a specific protocol.
- In the “Connection name” field, give the VPN connection a recognizable name.
- Input the server address provided by your VPN service in the “Server name or address” section.
- Choose the VPN type, such as PPTP, L2TP/IPsec, SSTP, or IKEv2.
- Enter the username and password provided by your VPN service.
- Toggle the switch “Remember my sign-in info” if desired.
Step 4: Save and connect to the VPN
- To save the VPN connection settings, click on the “Save” button.
- To connect to the VPN, click on the Network icon in the system tray, choose the VPN connection you just created, and click on the “Connect” button.
- Enter your VPN account username and password when prompted.
Step 5: Modify advanced VPN settings (optional)
- If necessary, modify settings such as encryption protocols, DNS settings, and more by clicking on “Advanced options” in the VPN settings.
Step 6: Disconnect from the VPN
- To disconnect from the VPN, click on the Network icon in the system tray.
- Choose the VPN connection you are currently connected to and click on the “Disconnect” button.
Conclusion:
That’s all you need to do to configure a VPN connection in Windows 10. Follow these simple steps to enhance your online security, privacy, and access to remote resources. Whether you’re browsing the internet or working from home, a VPN connection provides a valuable security measure that you can easily enable on your Windows 10 device
Unlock the full potential of your device with a discounted Windows 10 CD Key available for purchase on our website.


