How do I Configure Network Settings in Windows 11 Pro?
Configuring network settings in Windows 11 Pro is essential for optimizing your internet connection and ensuring smooth connectivity with other devices. Whether you’re connecting to a Wi-Fi network, setting up a VPN, or troubleshooting connectivity issues, this guide will walk you through the process.
Step 1: Accessing Network Settings
- Open Settings: Click on the Start menu and select the Settings gear icon. Alternatively, you can press Windows + I on your keyboard.
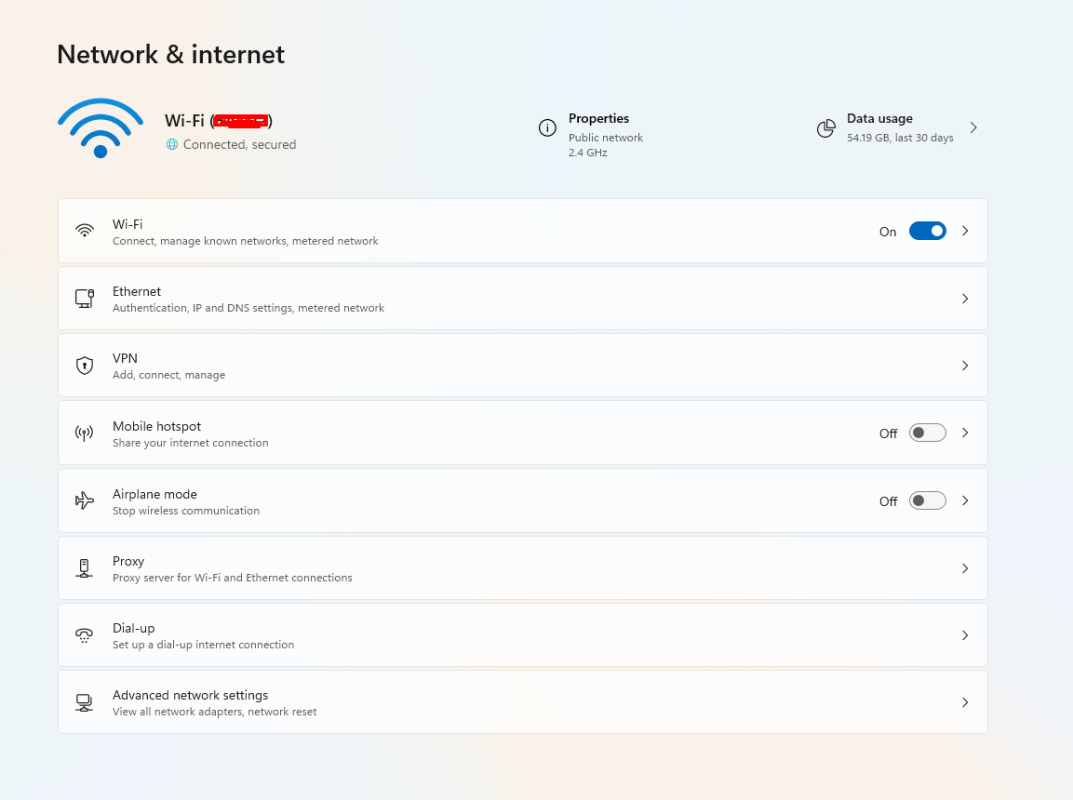
- Network & Internet: In the Settings window, click on Network & Internet from the left sidebar. Here, you will find various options to manage your network settings.

Step 2: Configuring Wi-Fi Settings
- Wi-Fi Options: If you are using a Wi-Fi connection, click on Wi-Fi from the Network & Internet section. Ensure that Wi-Fi is turned on.
- Connect to a Network: A list of available networks will appear. Click on the network you want to connect to and select Connect. Enter the password if prompted.
- Manage Known Networks: To manage your previously connected networks, select Manage known networks. Here, you can forget a network, change connection properties, or set a network as metered.
Step 3: Configuring Ethernet Settings
- Ethernet Connection: If you’re using a wired connection, click on Ethernet. Windows should automatically detect the connection.
- Network Properties: Click on the network name to view its properties. You can configure options like IP assignment (automatic or manual), DNS settings, and more.
Step 4: Setting Up a VPN
- VPN Settings: In the Network & Internet settings, click on VPN. If you have a VPN provider, click Add a VPN connection to configure your VPN settings.
- Enter VPN Details: Fill in the required fields, including the VPN provider, connection name, server address, and your login credentials. Click Save to apply the settings.
- Connect to VPN: After setting it up, return to the VPN settings page and click on the VPN connection to connect.
Step 5: Configuring Network Discovery and Sharing Options
- Network Discovery: Go back to the Network & Internet settings. Click on Advanced network settings.
- More network adapter options: Click on this link to access Network and Sharing Center. Here, you can manage network discovery and file sharing settings.
- Turn on Network Discovery: In the Network and Sharing Center, click on Change advanced sharing settings. Choose your current network profile (Private, Guest, or Public) and enable Turn on network discovery.
Step 6: Troubleshooting Network Issues
If you encounter connectivity issues, Windows 11 Pro provides built-in troubleshooting tools:
- Network Troubleshooter: In the Settings app, navigate to System and then Troubleshoot. Select Other troubleshooters, then find Internet Connections and click on Run to diagnose and fix problems.
- Reset Network Settings: If problems persist, you can reset all network settings. Go to Network & Internet, scroll down, and click on Advanced network settings. Find Network reset and follow the instructions to reset your network configuration.
Get the best deal on a genuine Windows 11 Pro Key – unlock powerful features at the lowest price today!


