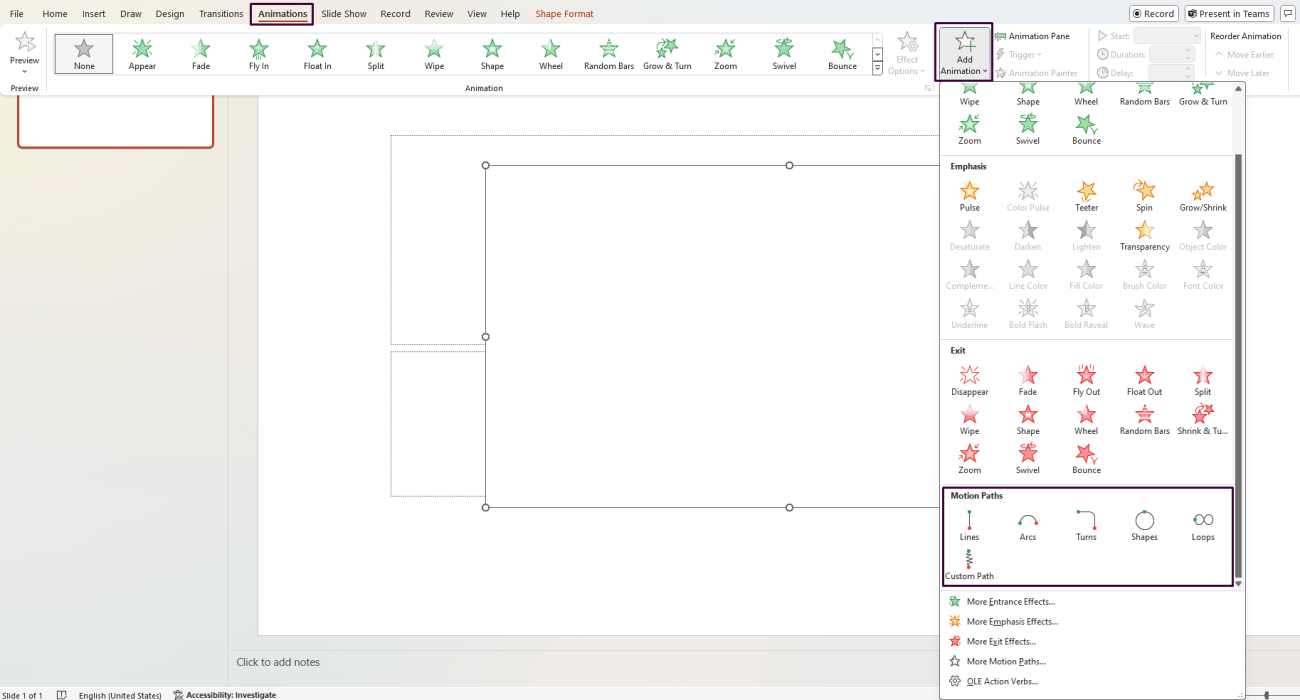
How do you Apply a Motion Path Animation to an Object in PowerPoint?
Adding motion path animation to objects in PowerPoint can provide dynamic movement to your presentations, making them more engaging. Follow these detailed steps to learn how to apply a motion path animation to an object in PowerPoint.
Step 1: Open Your PowerPoint Presentation
- Launch PowerPoint: Open Microsoft PowerPoint on your computer.
- Open a Presentation:
- Either create a new presentation by clicking on
Blank Presentation, or open an existing one by navigating toFile>Openand selecting your file.
- Either create a new presentation by clicking on
Step 2: Select the Slide
- Choose the Slide:
- In the Slide Navigation pane on the left, select the slide where you want to add the motion path animation.
Step 3: Insert an Object
- Insert Object:
- If the object you want to animate is not already on the slide, insert it by navigating to the
Inserttab. - Choose the type of object you want to add (e.g.,
Picture,Shape,Text Box). For example:- To insert a shape, click
Shapesand select your desired shape, then draw it on the slide.
- To insert a shape, click
- If the object you want to animate is not already on the slide, insert it by navigating to the
Step 4: Add the Motion Path Animation
- Select the Object:
- Click on the object you want to animate to select it.
- Go to the Animations Tab:
- Click on the
Animationstab located on the Ribbon.
- Click on the
- Open the Add Animation Dropdown:
- In the Advanced Animation group, click on
Add Animation.
- In the Advanced Animation group, click on
- Choose a Motion Path:
- Scroll down to the
Motion Pathssection in the dropdown menu. - Select a predefined path (e.g.,
Lines,Arc,Turn) or clickMore Motion Pathsfor additional options. - For example, select
Linesto see a simple linear motion path on the slide.
- Scroll down to the

Step 5: Customize the Motion Path
- Select the Animation Pane:
- Click on the
Animation Panebutton within the Advanced Animation group to open the Animation Pane on the right side of your screen.
- Click on the
- Edit the Motion Path:
- Click on the arrow next to the motion path animation in the Animation Pane to open the dropdown menu, then select
Effect Options. - In the
Effect Optionsdialog box, you can customize the start and end points of the path:LockedorUnlockedoptions can fix or free the motion path relative to the slide.- Click
OKafter making your changes.
- Click on the arrow next to the motion path animation in the Animation Pane to open the dropdown menu, then select
- Manually Adjust the Path:
- If needed, adjust the motion path directly on the slide by clicking and dragging the red and green arrow endpoints to new positions.
Step 6: Adjust the Animation Timing
- Select the Timing Tab:
- In the
Effect Optionsdialog box, switch to theTimingtab.
- In the
- Set the Start Option:
- Choose when the animation starts:
On Click,With Previous, orAfter Previous.
- Choose when the animation starts:
- Modify the Duration:
- Adjust the
Durationfield to set how long the animation takes to complete.
- Adjust the
- Set Delay (Optional):
- Adjust the
Delayfield if you want the animation to start after a certain amount of time.
- Adjust the
- Click
OKto save changes.
Step 7: Preview and Fine-Tune
- Preview the Animation:
- In the Animation Pane, click the
Play Frombutton to preview the motion path animation.
- In the Animation Pane, click the
- Make Adjustments:
- If necessary, repeat the above steps to fine-tune the motion path, timing, and other effects.
Get genuine Office keys at unbeatable prices to unlock the full potential of Microsoft Office for your personal or professional needs.

