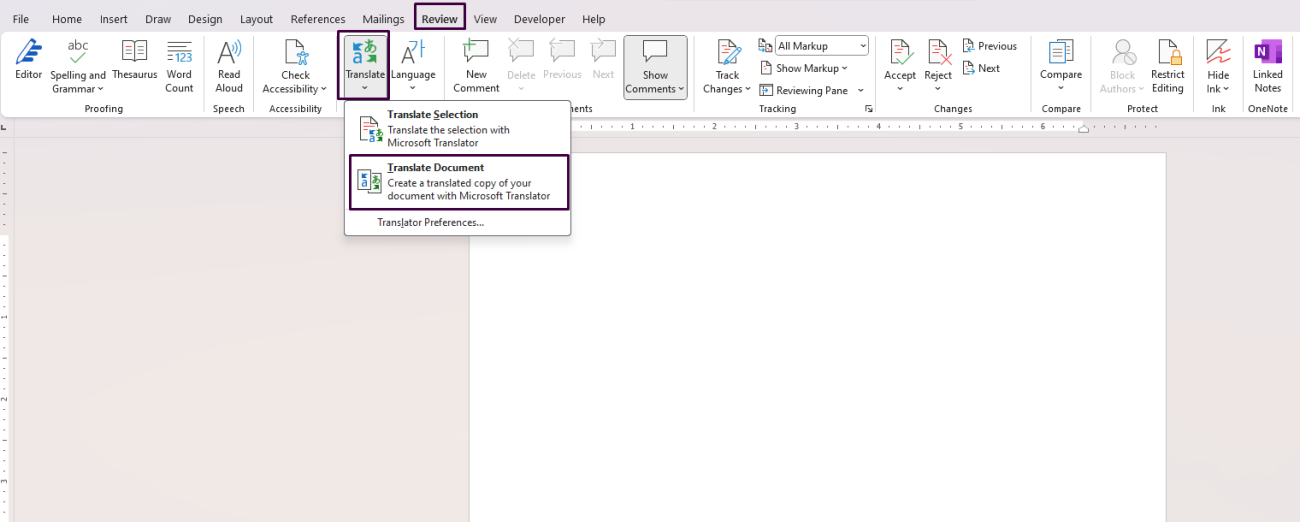
Translate text within a document in Microsoft Word and save you time and effort. Whether you need to understand a foreign-language document or communicate with international colleagues, Word’s built-in translation tools can help. This step-by-step guide will walk you through the process.
Step 1: Open Your Document
- Launch Microsoft Word: Open the Microsoft Word application on your computer.
- Open Your File: Click on
Filein the top-left corner of the window, then selectOpenand choose the document you want to translate. Alternatively, you can open a recent document from the home screen.
Step 2: Access the Translation Tools
- Navigate to the “Review” Tab: Click on the
Reviewtab in the ribbon at the top of the screen. The ribbon is the series of tabs at the top that start with “File” and “Home.” - Locate the “Language” Group: In the “Review” tab, find the “Language” group. This group contains various language tools including translation options.
Step 3: Choose What to Translate
Option 1: Translate the Entire Document
- Click on “Translate”: In the “Language” group, click the
Translatebutton. - Select “Translate Document”: From the dropdown menu, choose
Translate Document.

Option 2: Translate Selected Text
- Highlight the Text: Using your mouse, click and drag to highlight the text you want to translate.
- Click on “Translate”: In the “Language” group, click the
Translatebutton. - Select “Translate Selected Text”: From the dropdown menu, choose
Translate Selected Text.
Option 3: Use the Mini Translator
- Activate Mini Translator: Click on
Translatein the “Language” group and selectMini Translator. - Hover Over Text: Move your cursor to the word or phrase you want translated. The translation will appear in a small popup box.
Step 4: Choose the Target Language
- For Entire Document Translation:
- After selecting
Translate Document, a dialog box will appear. - In the dialog box, select your desired target language from the dropdown menu.
- Click
Translate.
- After selecting
- For Selected Text Translation:
- A panel will open on the right side of your screen called “Research.”
- In the “Research” pane, select your source and target languages.
- Instantly, the highlighted text will be translated in the pane.
Step 5: Insert Translated Text
For Entire Document Translation
- New Document Creation: Word will create a new document containing the translated text.
- Review and Save: Review the translation for accuracy. Then save the new document by clicking
File→Save As, and choose your desired location and file name.
For Selected Text Translation
- Copy Translated Text: In the “Research” pane, highlight the translated text.
- Paste into Document: Right-click and select
Copy, or use the keyboard shortcutCtrl + C. - Insert at Desired Location: Click where you want to place the translated text in your document and press
Ctrl + Vto paste.
Step 6: Adjust Translation Settings (Optional)
- Language Preferences: To customize your language settings, go to
File→Options→Language. - Proofing Tools: For better translation accuracy, make sure you have the appropriate proofing tools installed for your target languages.
Looking for a budget-friendly way to get Microsoft Office? Check out our affordable Office keys and save big on premium software!


