Creating Fillable Forms in Microsoft Word: A Step-by-Step Guide
Creating fillable forms in Microsoft Word can streamline data collection, whether you’re gathering information for surveys, applications, feedback forms, or any other purpose. Fillable forms are user-friendly and can be easily distributed and completed digitally. This step-by-step guide will walk you through the process of designing, formatting, and protecting your fillable forms in Microsoft Word.
Step 1: Prepare Your Document
Before diving into form creation, it’s essential to lay out the structure of your form:
- Open Microsoft Word and create a new document.
- Design the layout of your form. Consider what information you need to collect and how you want it organized. You might want to include headings, instructions, and space for responses.
For example, if you’re creating a registration form, you might include fields for name, address, email, and other relevant information.
Step 2: Enable the Developer Tab
The Developer tab in Word contains the tools you need to create and manage forms. By default, this tab is not visible, so you’ll need to enable it:
- Go to File > Options.
- In the Word Options window, select Customize Ribbon.
- In the right pane, check the box for Developer.
- Click OK to enable the Developer tab.
You should now see the Developer tab in the Ribbon, giving you access to form controls.
Step 3: Insert Form Fields
Now that you have the Developer tab enabled, you can start inserting various types of form fields:
- Text Box: For short responses like names or titles.
- Click on the Developer tab.
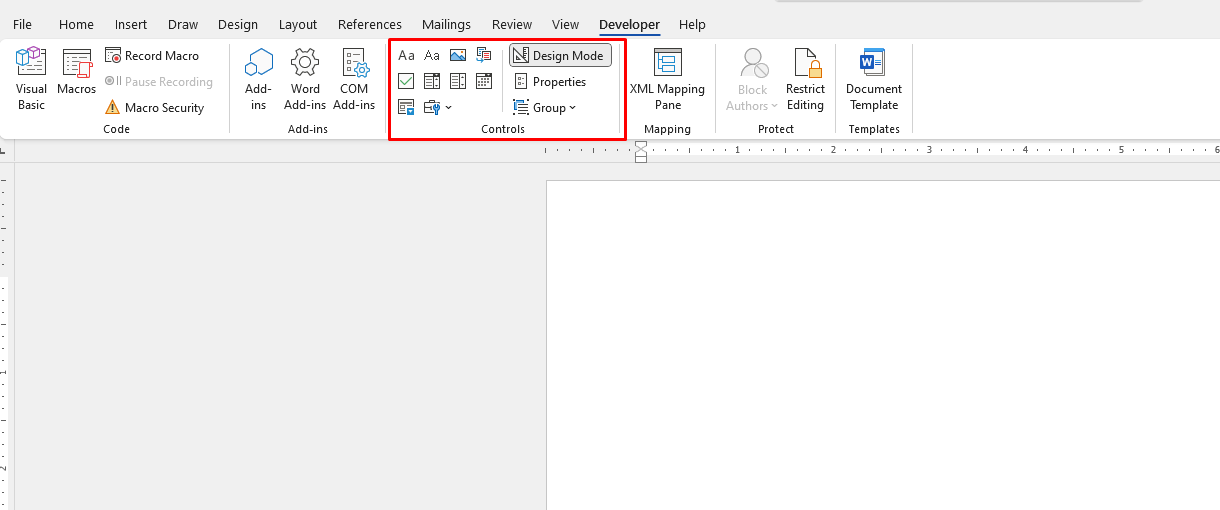
- Select Text Box from the Controls group. You can choose either a plain text content control or a rich text content control, depending on whether you want basic or formatted text.
- Check Box: For options that require yes/no answers.
- In the Developer tab, click on the Check Box Content Control.
- Drop-Down List: For predefined choices.
- Click on Drop-Down List Content Control.
- Select the control and click on Properties to add items to your drop-down list.
- Date Picker: For selecting dates.
- Click on the Date Picker Content Control to allow users to choose a date easily.
- Combo Box: For both text input and selection from a list.
- Insert a Combo Box Content Control and configure it similarly to a drop-down list.
Once you’ve inserted the necessary fields, arrange them in a logical order according to your form’s purpose.

Step 4: Customize Properties of Form Fields
Customizing the properties of your form fields can enhance user experience and ensure that the information collected meets your needs.
- Select a form field (e.g., a text box or drop-down list).
- Click on Properties in the Developer tab.
- For text boxes, you can set the maximum length, add placeholder text, or set the field as required.
- For drop-down lists, you can add or remove items and set a default option.
Customize each field based on what data you want to collect, making sure to provide clear instructions where necessary.
Step 5: Protect Your Form
To ensure that users can only fill out the fields and not alter the structure of your form, you need to protect it:
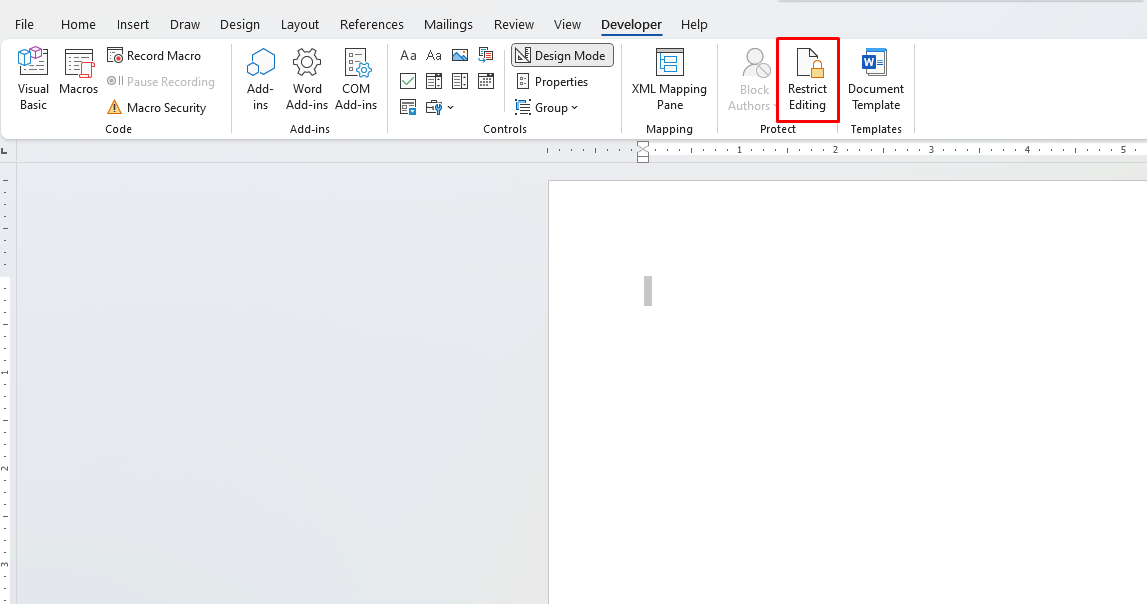
- Go to the Developer tab and click on Restrict Editing in the Protect group.
- In the Restrict Editing pane, check the box under Editing restrictions and select Filling in forms from the dropdown menu.
- Click on Yes, Start Enforcing Protection.
- Set a password (optional) to prevent others from making changes to the form structure. Be sure to remember this password, as you will need it to unlock the form later.
Once your form is protected, users will be able to fill in the fields but won’t be able to modify anything else.

Step 6: Save and Distribute Your Form
After creating and protecting your fillable form, it’s time to save and share it:
- Save your document as a Word Template (.dotx) or a regular Word document (.docx), depending on how you want to distribute it.
- To distribute the form, consider using email, a shared drive, or even a website where users can download the form.
If you want users to fill it out directly in Word, make sure they have the same version of Word or a compatible program.
Step 7: Collect Responses
Once users fill out the form, they can return it to you via email or a shared location. To collect and analyze the responses, follow these steps:
- Open each completed form.
- Review the data directly in Word, or copy the responses into a spreadsheet for easier analysis and management.
If you receive many forms, it might be more efficient to create a master document where you can consolidate all responses.
Unlock the full potential of Microsoft Office with genuine Office keys, providing you with lifetime access to essential productivity tools like Word, Excel, and PowerPoint—all at an affordable price.

