Top 10 Tips for Faster Document Editing in Word
Microsoft Word is one of the most widely used tools for creating and editing documents, whether for work, school, or personal projects. However, even seasoned users can find themselves bogged down by the time-consuming process of editing long documents. Fortunately, Word offers a wealth of time-saving features that can help you edit faster, more efficiently, and with greater accuracy. In this blog post, we’ll explore 10 top tips to speed up your document editing process in Word.
1. Use Keyboard Shortcuts
One of the easiest ways to speed up editing in Word is by mastering keyboard shortcuts. These shortcuts eliminate the need to constantly switch between your keyboard and mouse, allowing you to perform tasks much faster. Some essential shortcuts include:
- Ctrl + C (Copy)
- Ctrl + V (Paste)
- Ctrl + X (Cut)
- Ctrl + Z (Undo)
- Ctrl + Y (Redo)
- Ctrl + A (Select All)
- Ctrl + F (Find)
Learn more shortcuts specific to editing tasks, such as Ctrl + Shift + Right/Left Arrow to select entire words, or Ctrl + Shift + Up/Down Arrow to select whole paragraphs.
2. Enable Track Changes
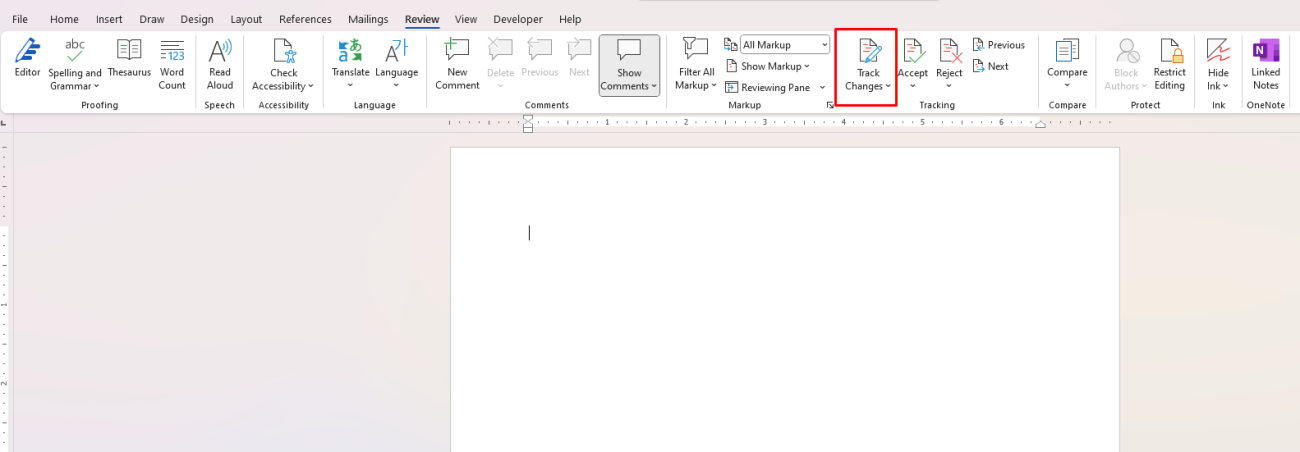
When working on documents that require revisions or collaboration, Track Changes is a game-changer. This feature allows you to see what changes have been made to a document, making it easier to review edits and accept or reject them.
To enable Track Changes, go to the Review tab and click on Track Changes. This will highlight any changes made and show them in different colors for clarity. You can also customize how edits appear (e.g., underline for insertions, strikethrough for deletions).

3. Use the Find and Replace Tool
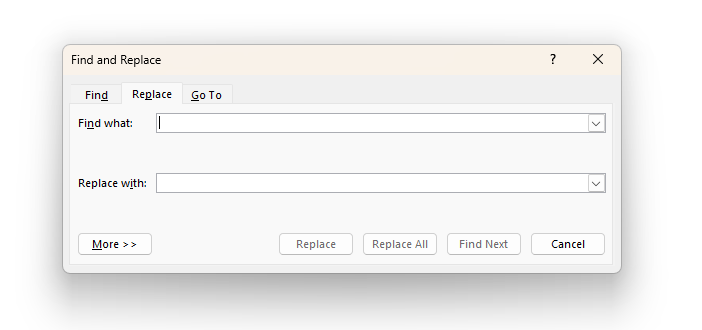
The Find and Replace tool is incredibly powerful when you need to quickly locate specific text or phrases and replace them throughout the entire document. It’s especially useful for things like fixing repeated typos, changing formatting, or adjusting certain words to be consistent.
- Press Ctrl + H to open the Find and Replace dialog box.
- Enter the word or phrase you want to find and the word you want to replace it with.
- Click Replace All to make global changes across the document.
You can even use Find to search for specific formatting or styles to replace.

4. Utilize Styles for Consistent Formatting
If your document requires consistent formatting, such as headings, body text, quotes, etc., using Styles will save you tons of time. Word’s built-in styles allow you to quickly apply the same formatting across headings and paragraphs with just a few clicks.
- Go to the Home tab and find the Styles section.
- Click on a predefined style, or create your own by modifying a style to fit your needs.
Once you apply styles, you can quickly navigate to any section of the document using the Navigation Pane (Ctrl + F) and jump to headings or sections easily.
5. Use Autocorrect and AutoText
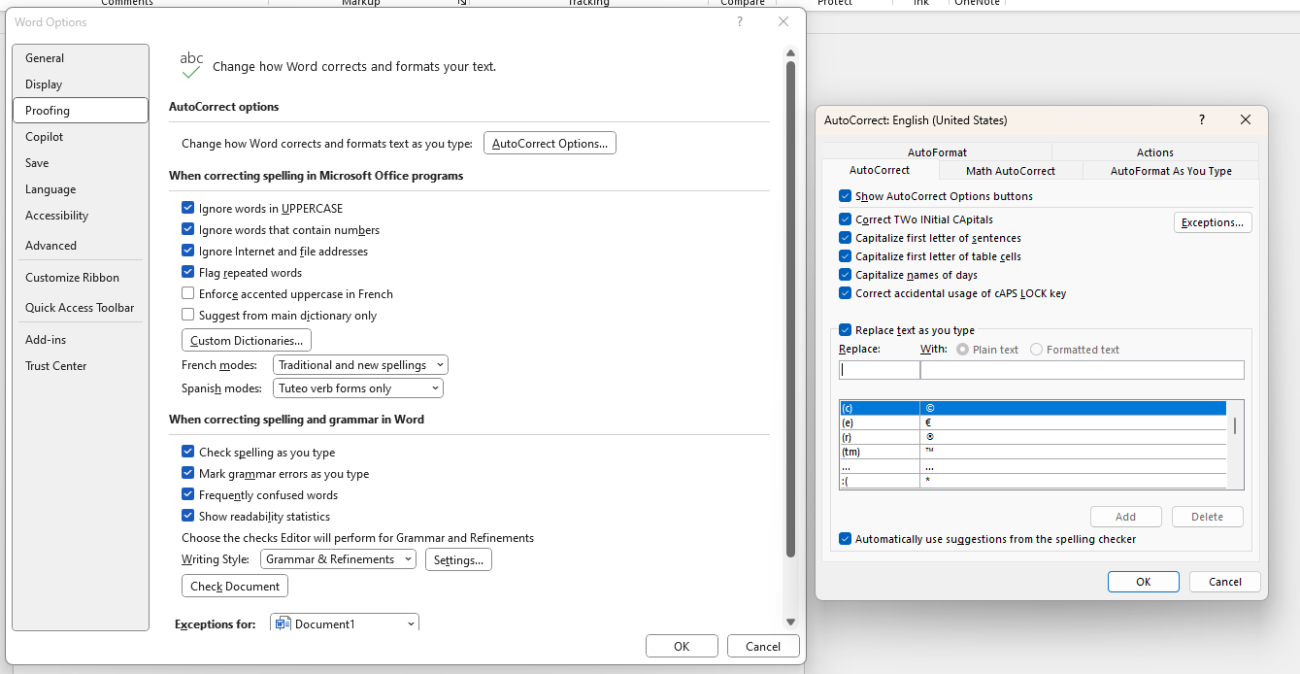
If you frequently type certain phrases or words, setting up Autocorrect or AutoText can save you time. Autocorrect automatically replaces abbreviations or misspelled words with the correct ones, while AutoText allows you to insert predefined text snippets quickly.
- To set up Autocorrect, go to File > Options > Proofing > AutoCorrect Options.
- Add commonly used words or phrases under AutoText by selecting the text and pressing Alt + F3 to save it.

6. Leverage the Spelling and Grammar Check
Word has a built-in spelling and grammar checker that can catch many common mistakes. While it’s not foolproof, it’s a great starting point for error-free documents.
- Enable the automatic spelling and grammar check by going to File > Options > Proofing and ensuring that Check spelling as you type is checked.
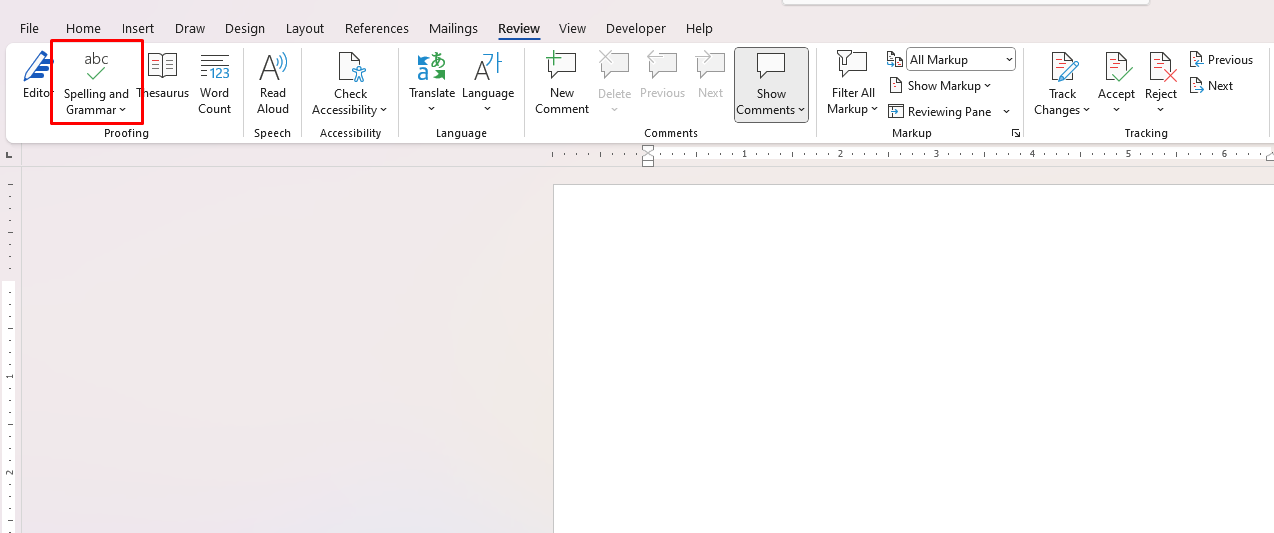
- For more thorough reviews, go to the Review tab and click Spelling & Grammar to check the entire document.

7. Use the Navigation Pane
When working on long documents, the Navigation Pane is an invaluable tool for quickly locating sections, headings, and even specific text. Instead of scrolling endlessly, use the Navigation Pane to jump between sections and make your editing process more efficient.
- To open the Navigation Pane, press Ctrl + F or go to the View tab and click on Navigation Pane.
- Use it to search for specific terms or navigate through the document’s headings.

8. Insert Comments for Quick Notes
When editing a document, it’s common to leave feedback or make temporary notes for yourself or others. Instead of typing these notes into the body of the document, use the Comment feature to insert comments directly into the margin. This keeps the document clean and organized.
- To add a comment, select the text where you want to add a comment, go to the Review tab, and click New Comment.
- You can add, delete, or reply to comments as needed, and they’ll appear in the margins, making the document easier to review.
9. Split the Document Window for Side-by-Side Editing
If you’re working on a large document and need to reference or edit multiple sections at once, Word allows you to split the document window so that you can view two parts of the document simultaneously.
- To split the window, go to the View tab and click Split. This will divide your document into two panes, which can be independently scrolled and edited.
- You can also use New Window (under the View tab) to open multiple windows of the same document side by side.
10. Use Macros for Repetitive Tasks
If you find yourself performing the same task repeatedly, creating a Macro can save you time and effort. A macro records a sequence of actions you perform in Word and then allows you to play them back with a single click.
- To create a macro, go to the View tab and click Macros > Record Macro.
- Name your macro and assign it a shortcut key. Once recorded, you can use the shortcut to repeat the task instantly.
Get cheap Office Keys at unbeatable prices—quality and affordability in one simple solution!

