Does Windows 11 Pro Support Hyper-V?
Yes, Windows 11 Pro supports Hyper-V, Microsoft’s native hypervisor for running virtual machines (VMs). Hyper-V is a powerful virtualization tool that allows users to create and manage multiple virtual machines on a single physical machine, enabling you to run different operating systems or isolated environments without the need for additional hardware.
Let’s explore what Hyper-V is, why it’s useful, and how you can enable it on Windows 11 Pro.
What is Hyper-V?
Hyper-V is a hypervisor that comes pre-installed with professional and enterprise versions of Windows, including Windows 11 Pro. It allows you to create and manage virtual machines (VMs) and run multiple operating systems in isolated environments. Each VM has its own virtualized hardware components like CPU, memory, storage, and networking, making it ideal for developers, IT professionals, and anyone who needs to run multiple OS environments simultaneously.
Key Features of Hyper-V on Windows 11 Pro
- Virtual Machine Creation: You can create VMs running various operating systems, including older versions of Windows, Linux, and even some server environments.
- Resource Allocation: Hyper-V allows you to allocate system resources (CPU, RAM, etc.) to each virtual machine as needed, providing flexibility in how you distribute your system’s power.
- Isolation and Security: Virtual machines run in isolated environments, ensuring that even if something goes wrong in one VM, it won’t affect your main system or other VMs.
- Testing and Development: Hyper-V is invaluable for developers and IT professionals who need to test software or configurations in a controlled environment before deploying them to production systems.
- Snapshots: Hyper-V allows you to take snapshots of VMs, enabling you to roll back to a previous state quickly and easily, which is particularly useful for testing and troubleshooting.
How to Enable Hyper-V in Windows 11 Pro
Although Hyper-V is included in Windows 11 Pro, it’s not enabled by default. Here’s how to enable and use Hyper-V:

Step 1: Check System Requirements
Before enabling Hyper-V, make sure your system meets the following requirements:
- Windows 11 Pro (Hyper-V is not available on the Home edition).
- 64-bit Processor with Second Level Address Translation (SLAT).
- At least 4 GB of RAM, although more is recommended for running multiple VMs.
- Virtualization Support in BIOS/UEFI (Intel VT-x or AMD-V).
Step 2: Enable Virtualization in BIOS/UEFI
You must ensure that hardware virtualization is enabled in your system BIOS or UEFI:
- Restart your computer and enter the BIOS/UEFI settings (usually by pressing F2, Del, or Esc during startup).
- Look for an option called Intel Virtualization Technology (Intel VT-x) or AMD-V and enable it.
- Save and exit the BIOS settings.
Step 3: Turn On Hyper-V in Windows 11 Pro
- Open the Start Menu and search for Turn Windows features on or off.
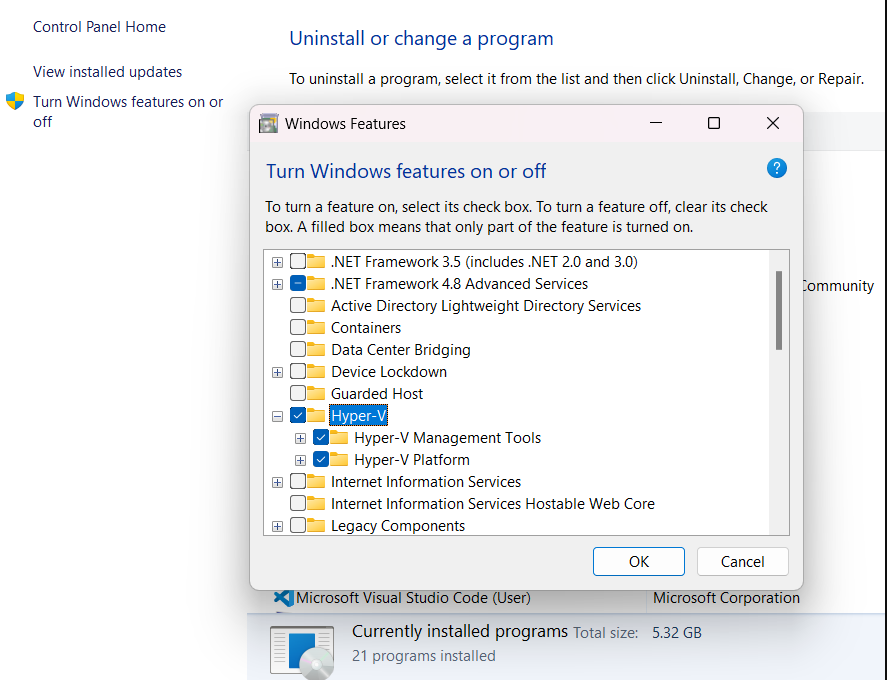
- In the Windows Features window, scroll down and check the box next to Hyper-V. Make sure both Hyper-V Management Tools and Hyper-V Platform are selected.
- Click OK and restart your computer when prompted.
Step 4: Access Hyper-V Manager
After your PC restarts:
- Open the Start Menu and search for Hyper-V Manager. This is the interface you will use to create and manage virtual machines.
- Launch Hyper-V Manager and begin creating virtual machines by selecting New > Virtual Machine from the right-hand pane.
Step 5: Create a Virtual Machine
Once Hyper-V Manager is open, you can follow the guided steps to create a new virtual machine:
- Click New > Virtual Machine and follow the wizard to specify the VM’s name, allocate resources, and install an operating system from an ISO file or disk.
- Once created, you can manage, configure, and run the virtual machine just like a separate computer.
Benefits of Using Hyper-V in Windows 11 Pro
- Cost Efficiency: Hyper-V comes built-in with Windows 11 Pro, eliminating the need for third-party virtualization tools like VMware or VirtualBox.
- High Performance: Hyper-V is optimized for running VMs with minimal impact on the host system’s performance.
- Network Virtualization: You can create virtual networks for testing different networking setups without the need for additional hardware.
- Backup and Restore: Hyper-V allows you to take snapshots of your virtual machines, making it easy to revert to a previous state if something goes wrong.
Limitations of Hyper-V in Windows 11 Pro
While Hyper-V is an excellent tool for most virtualization tasks, it does have a few limitations:
- Not Available on Home Edition: Hyper-V is only available on Windows 11 Pro, Enterprise, and Education editions.
- No Support for Some 3D Applications: Hyper-V lacks support for some advanced 3D applications and GPU-intensive tasks within the VM.
- Slight Learning Curve: While it’s user-friendly for professionals, those new to virtualization may find it takes some time to fully understand the management and configuration options.
Upgrade to Windows 11 Pro and unlock advanced security, powerful features, and enhanced productivity—get your genuine product key today at a great price!


