How can you Insert a Screenshot or Screen Slipping in Word?
Microsoft Word not only allows you to create richly formatted documents but also to enhance them by inserting screenshots and screen clippings. Screenshots and clippings add visual support and clarity to your content, making your documents more engaging. Here’s a step-by-step guide to help you insert screenshots or screen clippings in Word.
Step-by-Step Guide to Insert a Screenshot or Screen Clipping in Word
Step 1: Open Your Document
- Launch Microsoft Word: Open Word on your computer.
- Open a Document: Click
File>Openand select the document where you want to insert the screenshot or screen clipping.
Step 2: Insert a Screenshot
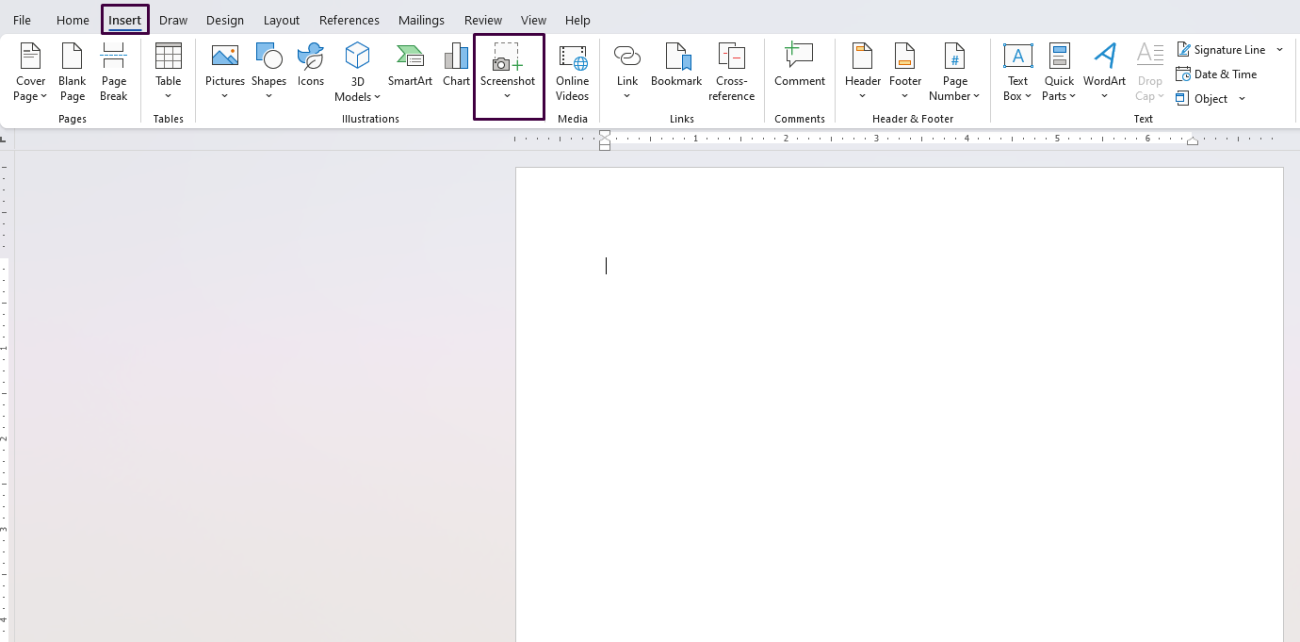
- Navigate to the Insert Tab:
- Go to the top of the screen and click on the
Inserttab.
- Go to the top of the screen and click on the
- Select the Screenshot Tool:
- In the
Illustrationsgroup, click onScreenshot.
- In the
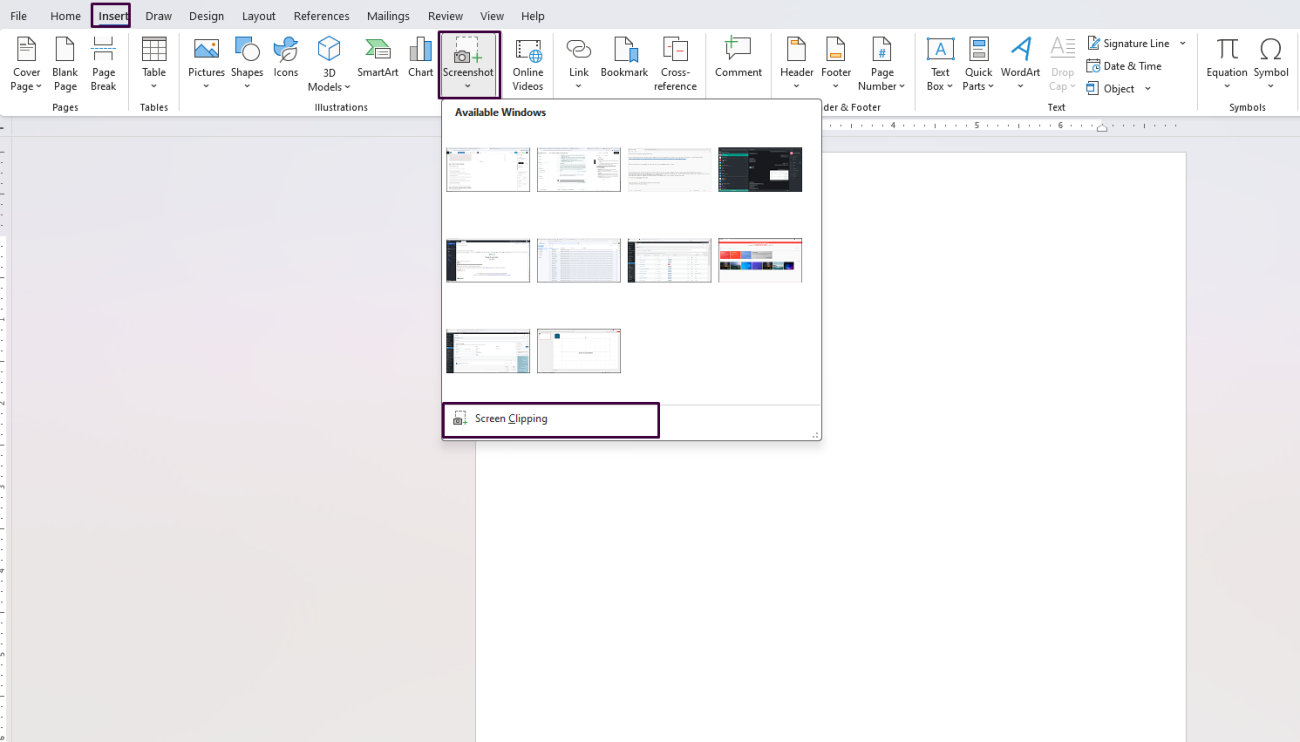
- Choose Available Windows:
- A dropdown menu will appear showing thumbnails of all open windows.
- Click on the thumbnail of the window you want to insert. The full window screenshot will be inserted into your document.
- Resize and Position the Screenshot:
- Click on the inserted screenshot.
- Use the handles (small boxes) on the edges to resize the image.
- Click and drag the image to place it in the desired position in your document.

Step 3: Insert a Screen Clipping
- Activate the Screenshot Tool:
- Again, go to the
Inserttab. - Click on
Screenshotin theIllustrationsgroup.
- Again, go to the
- Select the Screen Clipping Option:
- From the dropdown menu, select
Screen Clipping. - Word will automatically minimize, and your screen will appear dimmed.
- From the dropdown menu, select
- Capture the Clipping Area:
- Click and drag your mouse to select the area of the screen you want to clip.
- Release the mouse button to capture the selected area.
- The screen clipping will automatically be inserted into your document.
- Resize and Position the Clipping:
- Click on the inserted screen clipping.
- Use the handles to resize and drag to reposition the clipping as needed.

Step 4: Format the Inserted Image or Clipping
- Activate the Picture Tools Format Tab:
- Click on the inserted screenshot or screen clipping to activate the
Picture Tools Formattab at the top of the screen.
- Click on the inserted screenshot or screen clipping to activate the
- Apply Styles:
- In the
Picture Stylesgroup, choose a style that suits your document by clicking on the available options.
- In the
- Add Effects:
- Click on
Picture Effectsto add shadows, reflections, glows, and more.
- Click on
- Adjust with Corrections:
- Click on
Correctionsto adjust brightness and contrast. - Hover over the options to see how they look and click to apply.
- Click on
- Crop the Image:
- Click on
Cropif you need to trim the screenshot or screen clipping. - Use the cropping handles to remove unwanted areas and click outside the image to apply the crop.
- Click on
Practical Tips for Using Screenshots and Screen Clippings
- Relevance: Ensure the screenshot or screen clipping is relevant to your content and adds value.
- Clarity: Use high-resolution screenshots for better clarity and readability.
- Annotations: Consider adding annotations, such as arrows or highlights, using Word’s drawing tools to focus on key areas.
- Consistent Size: Maintain a consistent size for all screenshots and clippings to ensure a uniform look.
Unlock the full potential of your productivity with our genuine Microsoft Office Keys, available now at unbeatable prices!

