How do you Format a Document as a Newsletter in Word?
Creating a well-designed and professional-looking newsletter in Microsoft Word is easier than you might think. Word offers a range of tools and templates that can make this task straightforward. Whether you’re creating a newsletter for a business, school, or personal project, this guide will walk you through the steps to format your document as a newsletter.
Steps to Format a Document as a Newsletter
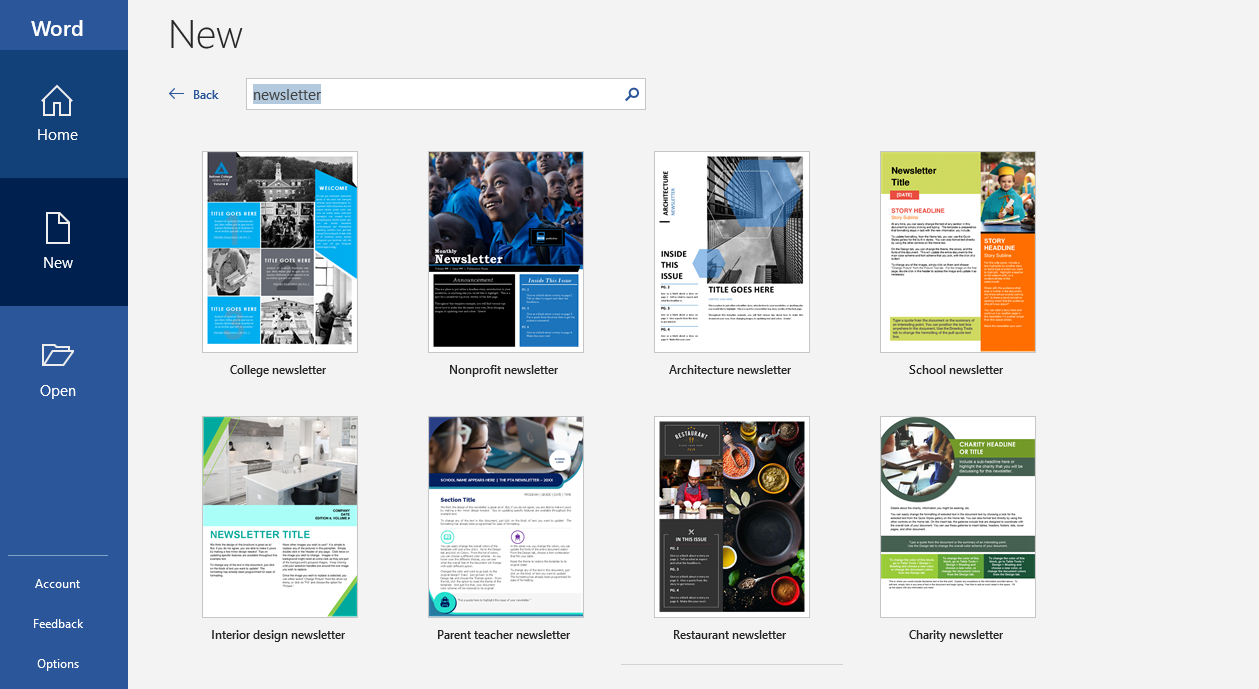
Step 1: Choose a Newsletter Template
- Open Microsoft Word: Launch Word on your computer.
- Select a Template:
- Click
File>Newto open the template gallery. - In the search bar, type “Newsletter” to find available templates.
- Browse through the options and select a template that fits your needs by clicking on it.
- Click
Createto open the selected template.
- Click

Step 2: Customize the Header
- Edit the Title: Click on the title area of the template and type in your newsletter’s title.
- Add a Logo:
- Click on the placeholder image if present, or go to
Insert>Picturesto add a logo from your computer. - Resize as needed by clicking and dragging the corners of the image.
- Click on the placeholder image if present, or go to
- Update the Date and Issue Number: Click on the date and issue sections, if available, and update them with the current details.
Step 3: Add and Format Content
- Insert Text: Click on the text boxes or placeholders and start typing your content. This can include articles, announcements, and other information.
- Format Text:
- Highlight the text you want to format.
- Use the formatting tools in the
Hometab to change the font, size, color, and alignment.
- Add Subheadings: Break your content into sections by inserting subheadings. Select
Heading 2orHeading 3styles from theStylesgroup in theHometab for consistency.
Step 4: Insert Images and Graphics
- Add Images: Place your cursor where you want the image to appear, then go to
Insert>Picturesand select an image. - Format Images:
- Click on the image to activate the
Picture Tools Formattab. - Use tools like
Crop,Wrap Text, andAlignto position and size the image appropriately.
- Click on the image to activate the
- Add Shapes and Icons: Go to
Insert>ShapesorIconsto insert graphic elements that enhance visual appeal.
Step 5: Use Columns for a Professional Layout
- Select Content: Highlight the text or section you want to format into columns.
- Insert Columns:
- Go to the
Layouttab. - Click
Columnsand select the number of columns you prefer (usually 2 or 3 for newsletters).
- Go to the
- Adjust Column Settings: Click
More Columnsfor additional options like spacing and column breaks.
Step 6: Add a Footer
- Insert Footer: Go to
Insert>Footerand select the style of footer you want. - Customize Footer: Click on the footer area to add page numbers, author names, or other relevant information.
Step 7: Check and Finalize
- Proofread: Go through your newsletter to check for spelling and grammar errors. Use the
Reviewtab for spell check and grammar tools. - Preview: Click on
File>Printto preview how your newsletter will look when printed. Make any final adjustments as needed.
Practical Tips for a Great Newsletter
- Consistent Branding: Use your brand colors, fonts, and logo consistently throughout the newsletter.
- Engaging Content: Write catchy headlines and engage your readers with interesting and relevant content.
- Visual Balance: Balance text and images to avoid overcrowding and maintain readability.
- Call to Action: Include a call to action, whether it’s visiting your website, subscribing, or attending an event.
Unlock the full potential of your productivity with our genuine Microsoft Office Keys, available now at unbeatable prices!

