How do you set up Automatic Text Replacement in Word?
Microsoft Word offers a powerful feature known as Automatic Text Replacement, also referred to as AutoCorrect. This feature automatically replaces predefined text with specified replacements as you type, saving time and reducing errors. Whether for correcting typos, inserting frequently used phrases, or using shorthand notations, AutoCorrect can be incredibly useful. Here’s a comprehensive guide on how to set up Automatic Text Replacement in Word.
Step-by-Step Guide to Set Up Automatic Text Replacement
Step 1: Open Microsoft Word
- Launch Microsoft Word: Begin by opening Microsoft Word on your computer.
- Open a Document: Open any existing document or create a new one by selecting
File > New.
Step 2: Access AutoCorrect Options
- Navigate to Word Options:
- Click on the
Filetab in the upper left corner. - Select
Optionsat the bottom of the menu to open the Word Options dialog box.
- Click on the
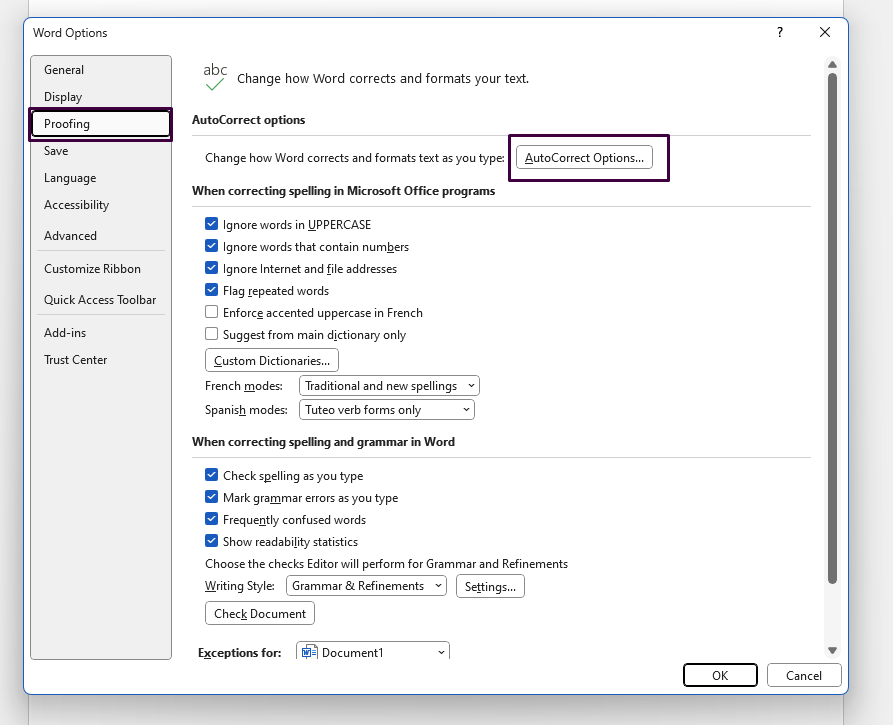
- Open Proofing Settings:
- In the Word Options dialog box, click on
Proofingin the left-hand panel. - Click on the
AutoCorrect Optionsbutton.
- In the Word Options dialog box, click on

Step 3: Configure AutoCorrect
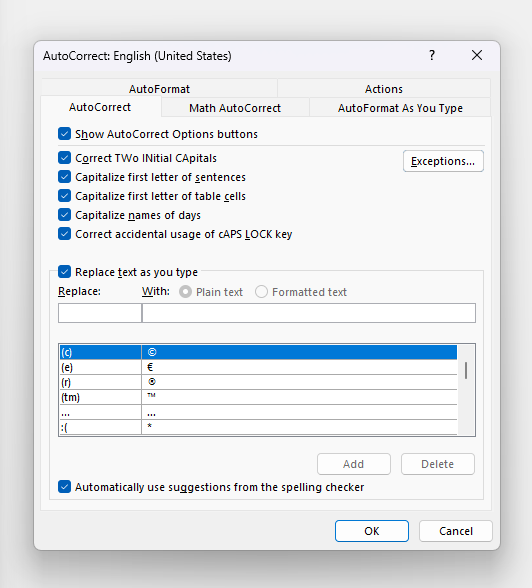
- AutoCorrect Tab:
- The AutoCorrect dialog box will open, defaulting to the AutoCorrect tab.
- Add a New Text Replacement:
- In the section labeled “Replace,” type the text or abbreviation you want to be automatically replaced. For example, type “omw”.
- In the “With” field, type the text you want to replace it with. For example, type “on my way”.
- Apply and Save:
- Click the
Addbutton to add your new replacement entry to the list. - Continue adding any other text replacements you need.
- Once done, click the
OKbutton to save your changes and close the AutoCorrect dialog box. - Click
OKagain in the Word Options dialog box to return to your document.
- Click the

Step 4: Test Your AutoCorrect Replacements
- Type Your Abbreviations:
- Go back to your document and type one of the abbreviations you set up (e.g., “omw”).
- Press the spacebar or Enter key. Word will automatically replace “omw” with “on my way”.
- Add More Replacements:
- Repeat the process to enter additional text replacements as needed.
Step 5: Managing AutoCorrect Entries
- Edit or Delete Entries:
- If you need to modify or remove an entry, follow steps 2 and 3 to navigate back to the AutoCorrect options.
- In the AutoCorrect dialog box, select the entry you want to change.
- Click
Replaceto edit the entry orDeleteto remove it.
- Use AutoCorrect as a Replacement for Symbols:
- AutoCorrect can also replace text with symbols or special characters. In the “With” field, use Insert > Symbol to select the desired character.
Practical Tips for Using AutoCorrect
- Common Typos: Use AutoCorrect to automatically fix common spelling errors.
- Frequent Phrases: Save time by setting up AutoCorrect for frequently used phrases or signatures.
- Shorthand Notations: Create shorthand for long technical terms or standard responses.
Unlock the full potential of your productivity with our genuine Microsoft Office Keys, available now at unbeatable prices!

