How to Resize Images in Microsoft Word?
To Resize images in Microsoft Word is a straightforward process, but it can make a big difference in the layout and overall appearance of your document. Whether you need to make an image smaller to fit into a page or larger to fill more space, this guide will walk you through the steps in a clear and detailed manner.
Step 1: Insert Your Image
- Open Your Document: Ensure that the Word document where you want to insert the image is open.
- Place the Cursor: Click at the location in the document where you want to insert the image.
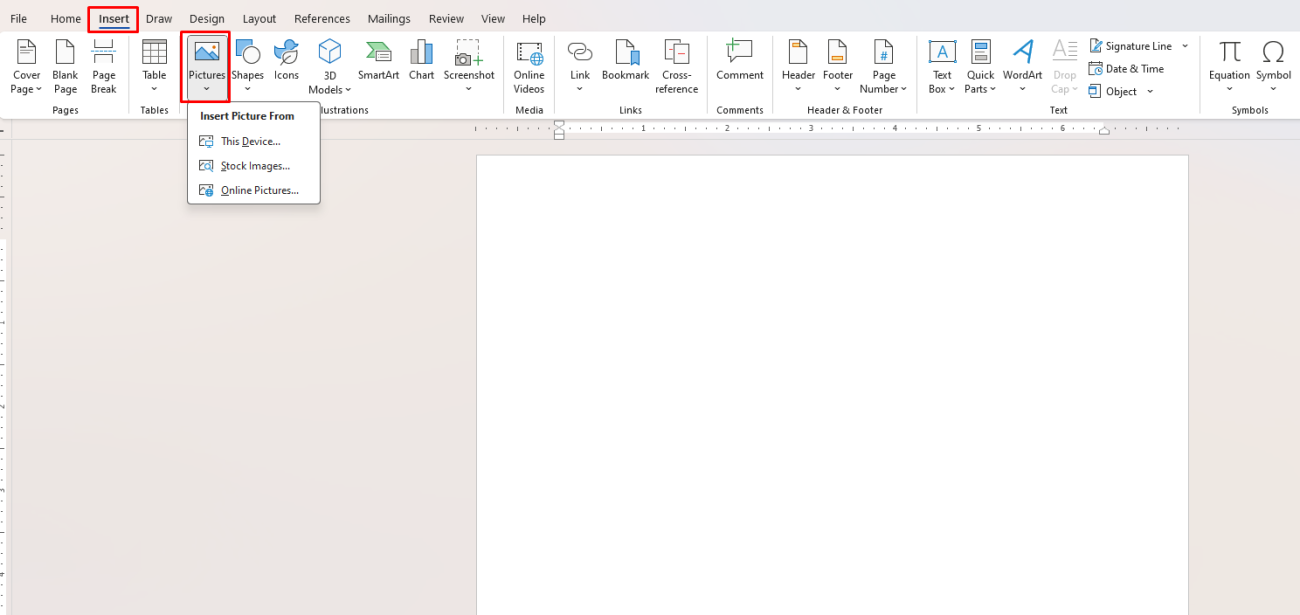
- Insert Image: Navigate to the “Insert” tab on the Ribbon.
- Select Picture: Click on “Pictures” and choose “This Device” to insert an image from your computer, or select “Online Pictures” to search for an image online.
- Choose Image: Locate and select the image you want to insert, then click “Insert.”

Step 2: Select the Image
- Click on the Image: Once the image is inserted, click on it to select it.
- Identify the Handles: You will notice small circles or squares (usually eight in total) appear around the edges of the image. These are the resize handles.
Step 3: Resize the Image Manually
- Select a Handle: Click and hold one of the corner handles. Using a corner handle is crucial for maintaining the aspect ratio of the image.
- Drag to Resize: While holding down the mouse button, drag the handle inward to make the image smaller or outward to make it larger.
- Maintain Aspect Ratio: Ensure you drag using only the corner handles to prevent distorting the image. Word may maintain aspect ratio by default, but holding the Shift key while dragging can also lock aspect ratio.
Step 4: Resize the Image Using Exact Measurements
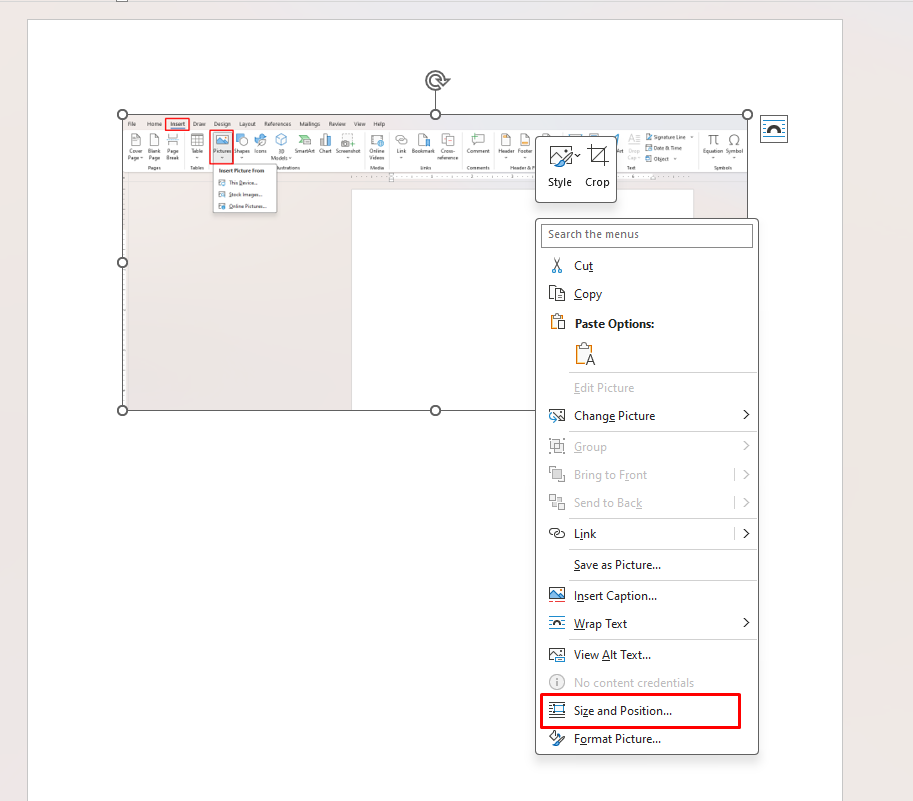
- Right-Click the Image: With the image still selected, right-click on it.
- Select “Size and Position”: From the context menu, click on “Size and Position.”
- Access Layout Tab: In the “Layout” dialog box, navigate to the “Size” tab.
- Set Height and Width: Under “Size,” you can manually enter the desired dimensions in the “Height” and “Width” boxes. Ensure you keep the “Lock aspect ratio” option checked if you want to maintain the image’s proportions.
- Click “OK”: Once finished, click “OK” to apply the changes.

Step 5: Fine-Tune the Image’s Position
- Move the Image: Click and drag the image to reposition it within your document.
- Use “Wrap Text”: If necessary, click the image, then go to the “Format” tab on the Ribbon. Click “Wrap Text” and choose how you want the text to flow around the image (e.g., “Square,” “Tight,” “Behind Text,” etc.).
Step 6: Save Your Document
- Save Progress: After resizing and positioning your image, make sure to save your changes by clicking on “File” in the Ribbon.
- Select “Save” or “Save As”: Choose “Save” to save the current document, or “Save As” if you want to save a new version or location.
Unlock the full potential of your productivity suite with our genuine Office Keys, now available at unbeatable low prices!

