Using Word’s Outline View for Long Documents
When working with long documents in Microsoft Word, managing and structuring content can become overwhelming. Whether you’re writing a report, thesis, novel, or business proposal, keeping track of sections, headings, and overall organization is crucial. This is where Outline View comes in—a powerful yet often overlooked feature that helps you navigate, organize, and restructure your document efficiently.
In this guide, we’ll explore how to use Word’s Outline View to streamline your writing process and enhance productivity.
What is Outline View in Word?
Outline View provides a hierarchical view of your document by displaying headings and subheadings in a structured format. Instead of scrolling through pages, you can quickly rearrange sections, collapse or expand content, and focus on the overall structure of your document.
Benefits of Using Outline View
✅ Easier Navigation – Jump between sections without endless scrolling.
✅ Quick Reorganization – Drag and drop headings to rearrange content effortlessly.
✅ Improved Document Structure – Identify and fix inconsistencies in your outline.
✅ Better Focus – Work on one section at a time without distractions.
How to Access Outline View
To open Outline View in Microsoft Word:
1️⃣ Open your document in Microsoft Word.
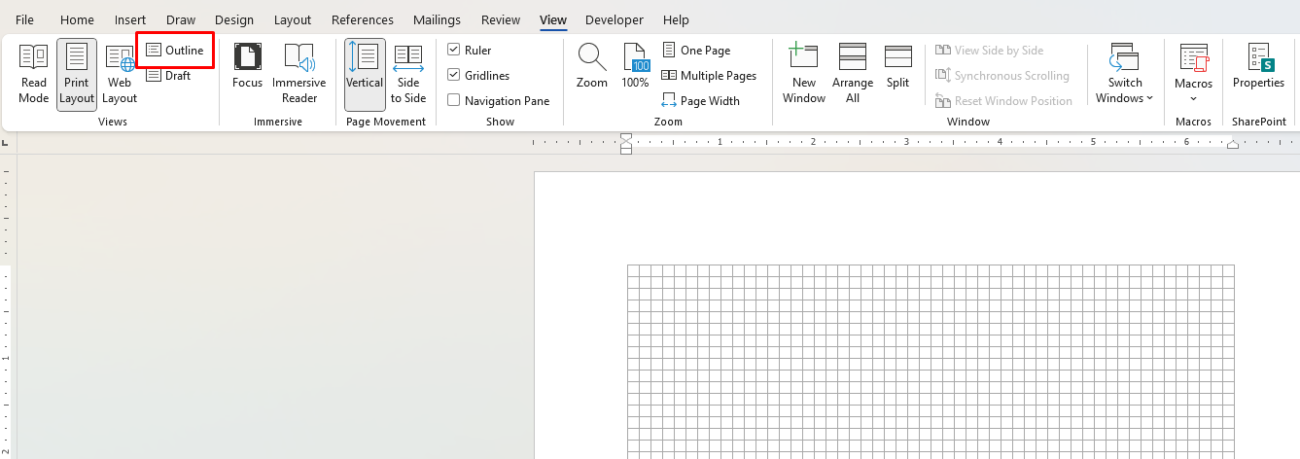
2️⃣ Click on the View tab in the ribbon.
3️⃣ Select Outline from the options.

Once in Outline View, your document will be displayed as a structured list of headings and subheadings, allowing for easy navigation and editing.
Using Outline View to Organize Your Document
Step 1: Use Headings for Structure
Outline View works best when you use Word’s built-in heading styles (Heading 1, Heading 2, Heading 3, etc.). If your document isn’t already formatted with headings, you can:
1️⃣ Select a section title.
2️⃣ Go to the Home tab.
3️⃣ Choose a Heading style (e.g., Heading 1 for main sections, Heading 2 for subsections).
Once you apply these styles, your document will automatically appear as a structured outline in Outline View.
Step 2: Expand and Collapse Sections
One of the best features of Outline View is the ability to collapse or expand sections to focus on specific parts of your document.
🔹 Click on the small triangle next to a heading to collapse or expand its content.
🔹 This helps you hide unnecessary details and focus on the big picture.
Step 3: Rearrange Sections Easily
If you need to move sections around, Outline View makes it easy:
✅ Click on a heading, and the corresponding text will be selected.
✅ Use the Up or Down arrows in the Outline Tools to move the section.
✅ You can also drag and drop headings to reorder sections quickly.
This is especially useful for large documents where restructuring content can otherwise be time-consuming.
Step 4: Adjust Heading Levels
In Outline View, you can promote or demote headings to change their hierarchy:
🔹 Promote a heading (move it up in hierarchy) – Click “Promote” or press Shift + Alt + Left Arrow.
🔹 Demote a heading (make it a subheading) – Click “Demote” or press Shift + Alt + Right Arrow.
This helps refine your document’s organization by ensuring that main sections and subsections are properly arranged.
Step 5: Exit Outline View
Once you’ve structured your document, you can return to the normal view by:
1️⃣ Clicking on the View tab.
2️⃣ Selecting Print Layout or Draft View to see your document as usual.
Your formatting and content remain intact, but now your document is better organized!
Tips for Using Outline View Effectively
✔ Start with an Outline – Before writing, outline your key points to create a structured document from the beginning.
✔ Use Headings Consistently – Apply Word’s heading styles to maintain a clear document structure.
✔ Save Different Versions – If making major changes, save a copy of your document before reorganizing.
✔ Combine with Navigation Pane – Use Navigation Pane (View > Navigation Pane) alongside Outline View for easy reference.
Get the cheapest Microsoft Office keys with instant delivery and secure activation—save big on genuine Office licenses today!

