Word Formatting Tricks You Wish You Knew Sooner
Microsoft Word is a staple for many professionals, students, and writers alike. While it’s easy to get by with the basics, knowing a few formatting tricks can drastically improve the look of your documents and save you hours of frustration. Here are some Word formatting tricks that you’ll be glad to know sooner!
1. Use Styles for Consistent Formatting
One of the most powerful features in Word is Styles. Instead of manually formatting each section of text, use Styles to quickly apply consistent formatting to headings, paragraphs, quotes, and more.
- How to Apply Styles: Go to the Home tab, and you’ll see a section called Styles. Highlight the text you want to format and click on a style (e.g., Heading 1, Heading 2).
- Customizing Styles: Right-click on any style and choose Modify to adjust the font, size, color, and alignment. These changes apply automatically to all text using that style.
This trick not only improves consistency but also makes your document easy to navigate and edit.

2. Create Table of Contents in Seconds
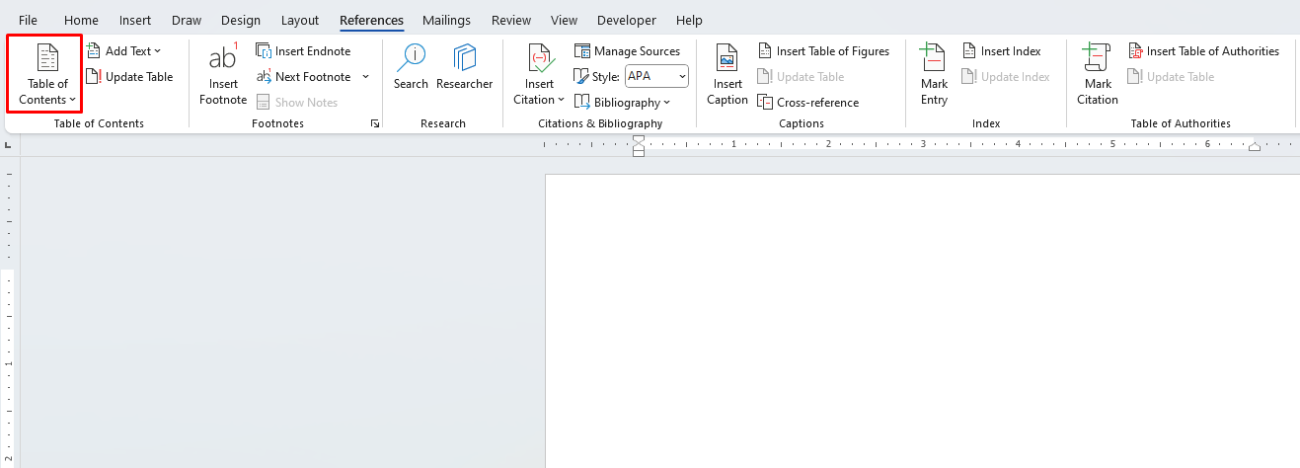
Once you’ve set up styles for headings, you can generate a Table of Contents (TOC) with just a few clicks.
- Inserting a TOC: Go to the References tab, click Table of Contents, and choose a style. Word will automatically create a TOC based on your headings.
- Updating the TOC: If you make changes to your document, simply right-click the TOC and select Update Field to refresh it.
This is especially useful for long documents, reports, and academic papers.

3. Use the Format Painter for Quick Copying
The Format Painter tool lets you copy the formatting from one piece of text and apply it to another, saving you the hassle of manually adjusting each section.
- How to Use: Highlight the text with the formatting you want, click the Format Painter (paintbrush icon in the Home tab), and then click on the text where you want to apply the format.
- Double-Click Trick: Double-click the Format Painter icon to lock it, allowing you to apply the same format to multiple sections without re-selecting it.
This is a quick way to ensure consistent formatting across your document.
4. Adjust Line and Paragraph Spacing for Readability
Proper line and paragraph spacing can make your document look professional and easy to read. Word offers simple adjustments for spacing that can improve the flow of your document.
- Line Spacing: Go to Home > Line and Paragraph Spacing. Options like 1.5 or double-spacing are ideal for readability.
- Paragraph Spacing: Select Add Space Before Paragraph or Remove Space After Paragraph to adjust spacing without adding extra lines. This keeps the document clean and professional.
You’ll be amazed at how much more polished your document can look with the right spacing.
5. Use Columns for Complex Layouts
For newsletters, brochures, or any document with multiple sections, try using Columns to organize content neatly.
- Adding Columns: Go to Layout > Columns and select the desired number of columns.
- Customizing Column Widths: Choose More Columns to adjust widths and add space between columns. You can even apply columns to specific sections for a hybrid layout.
Columns can add a sophisticated touch and make complex layouts look professional.
6. Set Custom Margins and Page Sizes
While Word offers default margins and page sizes, you can customize them to fit your specific needs.
- Custom Margins: Go to Layout > Margins > Custom Margins to adjust margins. Narrow margins can make your document feel more compact, while wider margins give a more spacious look.
- Page Size: Under Layout > Size, choose from different sizes like A4, Letter, or create a custom size for unique projects.
Custom margins and sizes are especially useful when preparing documents for printing or specific formatting requirements.
7. Utilize Drop Caps for Impact
Adding a Drop Cap to the first letter of a paragraph can give your document a stylish, magazine-like look.
- Adding a Drop Cap: Place your cursor at the beginning of the paragraph, go to Insert > Drop Cap, and choose a style.
- Customization: Choose Drop Cap Options to adjust the font, size, and how far down it drops into the text.
This trick works great for introductions, newsletters, or any document where you want to make a statement.
8. Insert Footnotes and Endnotes
For research papers or any document that requires references, Word makes it easy to add Footnotes and Endnotes.
- Adding Footnotes: Place your cursor where you want the reference number, go to References > Insert Footnote. Word will create a numbered footnote at the bottom of the page.
- Endnotes: Choose Insert Endnote for notes that appear at the end of the document.
This is essential for professional reports, academic writing, or any content that requires source citations.
9. Take Advantage of Text Boxes for Flexibility
Text boxes are a fantastic way to control the position of content within your document, especially for more visually complex layouts.
- Inserting a Text Box: Go to Insert > Text Box and select a style or draw a custom box.
- Format and Arrange: You can adjust the position, wrap text around it, and add borders or shading for emphasis.
Text boxes are ideal for quotes, captions, or information that needs to stand out in your document.
10. Use Keyboard Shortcuts for Faster Formatting
Speed up your formatting with a few key Keyboard Shortcuts:
- Bold:
Ctrl + B - Italicize:
Ctrl + I - Underline:
Ctrl + U - Center Align:
Ctrl + E - Justify:
Ctrl + J
Learning a few basic shortcuts can save time and keep your hands on the keyboard.
Get genuine Microsoft Office keys at affordable prices and enjoy premium productivity tools without breaking the bank!

