How can you Create and Manage Scenarios in Excel?
When it comes to performing what-if analysis, Excel offers a powerful tool called “Scenario Manager.” Scenarios are sets of values that Excel saves and can substitute automatically in your worksheet. This feature allows you to create multiple scenarios and compare them to see how different inputs affect the outcomes. In this comprehensive guide, we’ll walk you through the steps to create and manage scenarios in Excel.
Step 1: Prepare Your Data
Before you start using Scenario Manager, ensure your data is well-organized. Typically, you would have constants and formulas set up in your spreadsheet.
Example Layout:
- A1: Sales
- A2: Costs
- A3: Profit
- B1: 50000 (Sales Value)
- B2: 30000 (Costs Value)
- B3: =B1-B2 (Profit Formula)
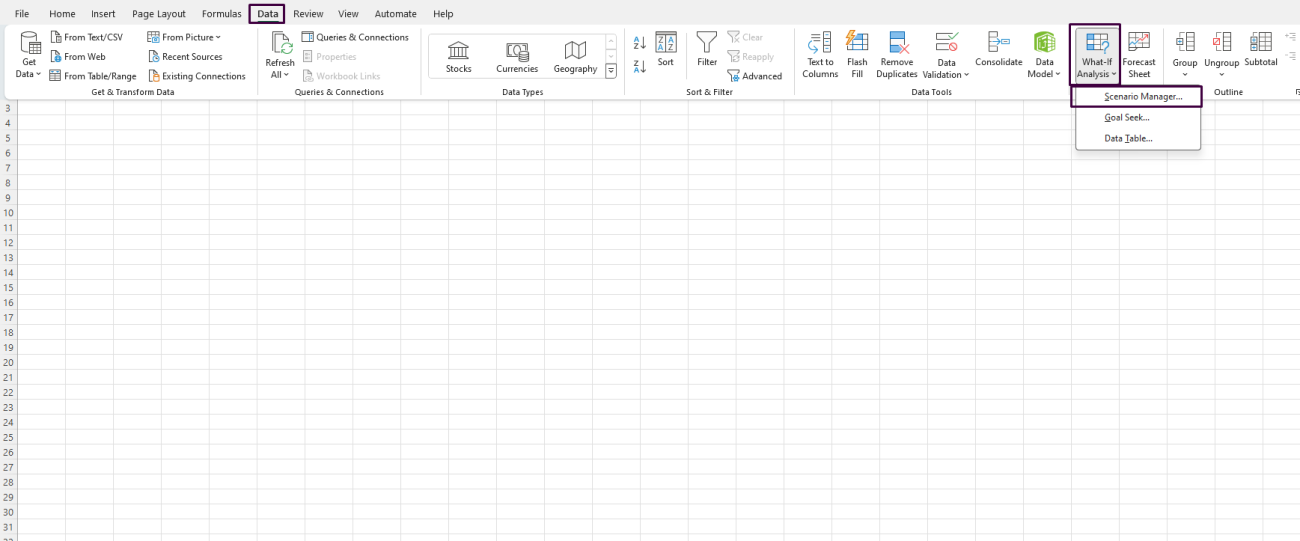
Step 2: Open Scenario Manager
- Go to the
Datatab on the Ribbon. - In the
Forecastgroup, click onWhat-If Analysis. - Select
Scenario Managerfrom the drop-down menu.

Step 3: Add a New Scenario
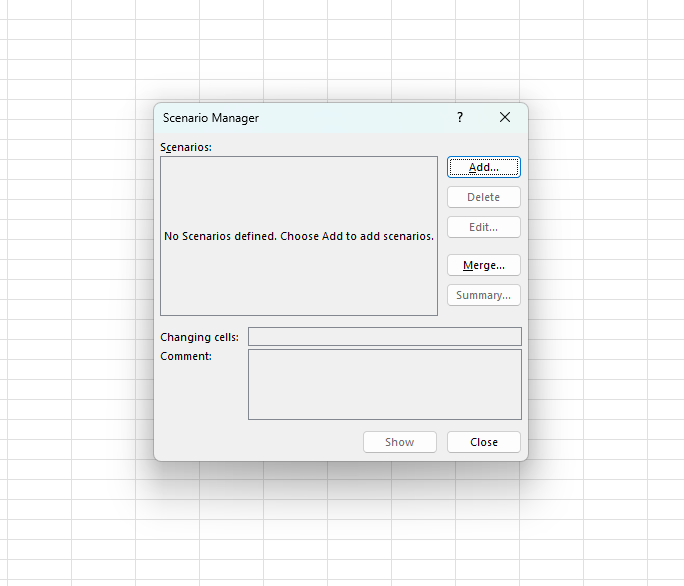
- In the Scenario Manager dialog box, click
Add. - Scenario Name: Give your scenario a descriptive name (e.g., “Best Case”).
- Changing Cells: Select the cells that you want to change (e.g.,
B1andB2for Sales and Costs respectively). - Click
OK.

Step 4: Enter Scenario Values
- In the
Scenario Valuesdialog box, input the values for Sales and Costs for the “Best Case” scenario (e.g.,60000for Sales and25000for Costs). - Click
OK.
Step 5: Add Additional Scenarios
Repeat Step 3 and Step 4 to add more scenarios (e.g., “Worst Case” and “Most Likely Case”).
- For “Worst Case,” enter values like
40000for Sales and35000for Costs. - For “Most Likely Case,” enter values like
55000for Sales and28000for Costs.
Step 6: Display a Scenario
- In the
Scenario Managerdialog box, select the scenario you want to display (e.g., “Best Case”). - Click on the
Showbutton. - Observe how the values for Sales, Costs, and Profit change according to the selected scenario.
Step 7: Generate a Summary Report
- While still in the
Scenario Managerdialog box, click on theSummarybutton. - Choose the type of report you want (e.g., Scenario Summary).
- Result Cells: Select the cell or cells that contain formulas for which you want to see the results (e.g.,
B3for Profit). - Click
OK.
Excel will generate a new worksheet with a detailed summary report comparing each scenario.
Step 8: Edit a Scenario
- In the
Scenario Managerdialog box, select the scenario you want to edit. - Click on the
Editbutton. - Make any necessary changes to the name, changing cells, or scenario values.
- Click
OKto save changes.
Step 9: Delete a Scenario
- In the
Scenario Managerdialog box, select the scenario you want to delete. - Click on the
Deletebutton. - Confirm the deletion by clicking
OK.
Practical Applications of Scenario Manager
- Budget Planning: Compare different budget scenarios to see how various expenditures will affect your bottom line.
- Sales Forecasting: Evaluate how different sales numbers will impact your profit and revenue.
- Project Management: Plan for best-case, worst-case, and most likely scenarios to better manage project risks.
Unlock the full potential of your productivity by purchasing genuine Office Keys from our website, ensuring you receive the best in office software solutions.

