How can I Track Changes and Accept/Reject Revisions in Word?
Tracking changes and managing revisions in Microsoft Word is crucial for collaborative editing and document management. Whether you’re working with a team or reviewing feedback, Word’s tracking features help you monitor edits and make decisions on revisions. Here’s a step-by-step guide to help you track changes and accept or reject revisions in Word.
Step 1: Turn On Track Changes
To start tracking changes in your document:
- Open the Word document you want to edit.
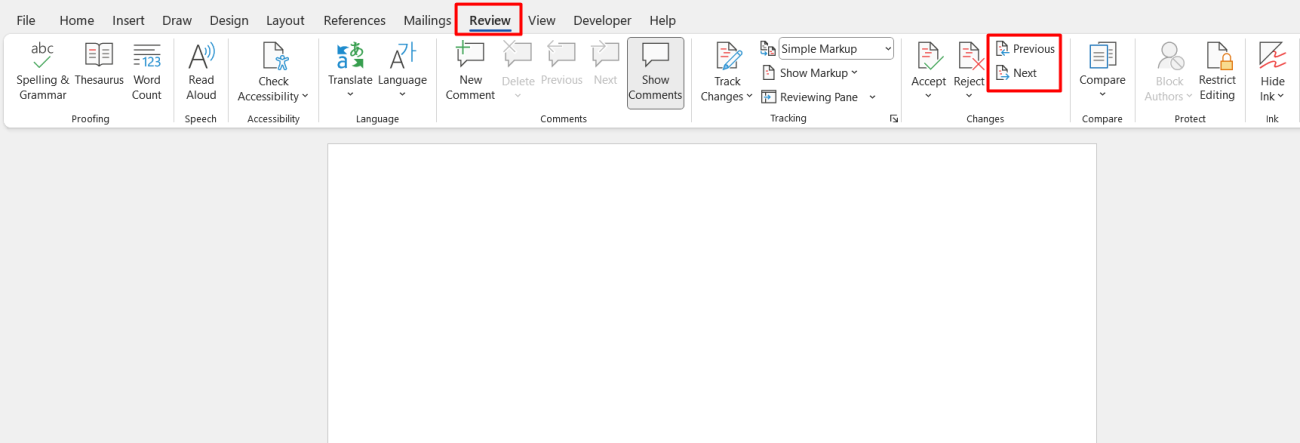
- Go to the Review tab on the ribbon.
- Click Track Changes in the Tracking group to turn on the feature. The button will highlight to indicate that tracking is enabled.
When Track Changes is activated, all edits made to the document, including insertions, deletions, and formatting changes, will be recorded.

Step 2: Make Edits and Add Comments
As you or others make changes to the document:
- Any insertions, deletions, or formatting changes will be highlighted with different colors and markers.
- To add comments or feedback, select the text you want to comment on, go to the Review tab, and click New Comment. Type your comment in the balloon that appears in the margin.
Step 3: Review Changes and Comments
To review the changes and comments made:
- Navigate to the Review tab.
- Use the Previous and Next buttons in the Changes group to move between revisions and comments.
- Review the highlighted changes and read any comments that have been added.

Step 4: Accept or Reject Changes
To accept or reject individual changes:
- In the Review tab, locate the Changes group.
- Use the Accept or Reject buttons to handle each change:
- Click Accept to incorporate the change into the document.
- Click Reject to discard the change.
- You can also choose to accept or reject all changes at once by clicking the dropdown arrow next to Accept or Reject and selecting Accept All Changes or Reject All Changes.

Step 5: Finalize Your Document
After reviewing and accepting or rejecting all changes:
- To finalize your document, you may want to turn off Track Changes. Go back to the Review tab and click Track Changes to disable it.
- Review the document one last time to ensure that all changes have been properly addressed.
Step 6: Save the Document
Save your document to preserve the final version:
- Click File and select Save or Save As if you want to keep a copy of the original document with tracked changes.
Step 7: Optional: Print or Share the Document
If you need to print or share the document:
- Go to the File tab and select Print.
- Choose your print settings and click Print to get a hard copy of the document.
- Alternatively, to share the document, select Share from the File tab and choose your sharing method (e.g., email, OneDrive).
Get genuine Office Keys at the lowest prices available on our website for unbeatable savings and instant access.

