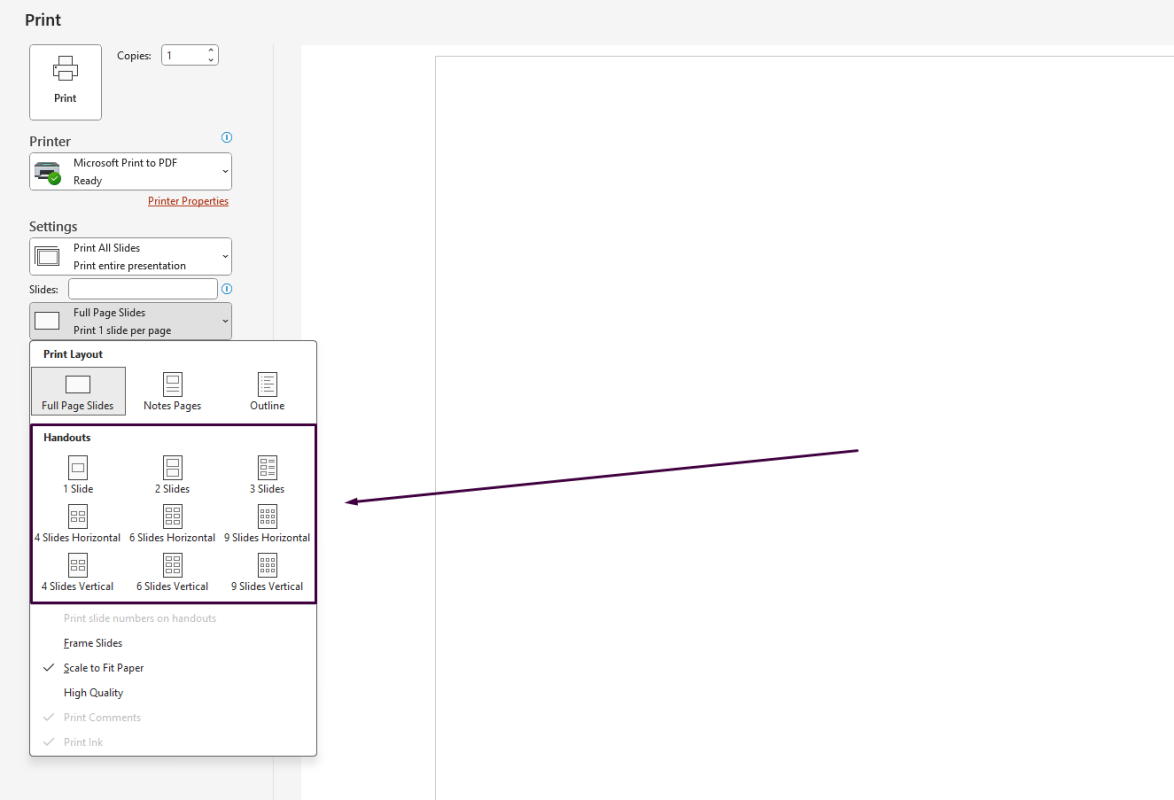
How do you Print PowerPoint Presentations as Handouts?
Printing PowerPoint presentations as handouts is a great way to provide your audience with a physical copy of your slides for easier note-taking and reference. This guide will walk you through the step-by-step process to print PowerPoint presentations as handouts.
Step 1: Open Your PowerPoint Presentation
- Launch PowerPoint on your computer.
- Open the presentation you want to print by going to
File>Openand selecting your file.
Step 2: Access the Print Menu
- Click on
Filein the upper-left corner of the screen. - From the dropdown menu, select
Print.
Step 3: Choose the Printer
- In the Print menu, look for the
Printersection. - Click the dropdown menu to select your desired printer. Ensure you have the correct printer connected and ready.
Step 4: Select Handout Layout
- In the
Settingssection of the Print menu, click the first dropdown menu that’s typically set toFull Page Slidesby default. - In the dropdown, select
Handouts. Various handout options will appear, such asHandouts (2 Slides Per Page),Handouts (3 Slides Per Page), etc.- Choose the layout that best fits your needs. For example:
Handouts (3 Slides Per Page)is a popular choice as it provides room for audience notes beside each slide.
- Choose the layout that best fits your needs. For example:

Step 5: Adjust Additional Print Settings
- In the Print menu, adjust additional settings if necessary:
- Slides: Choose
All Slidesor specify a range of slides if you don’t need to print the entire presentation. - Color: Select
Color,Grayscale, orPure Black and Whitebased on your preferences and your printer capability. - Collated: Choose whether to collate the print jobs if printing multiple copies.
- Slides: Choose
- Preview the handouts in the preview pane on the right side of the Print menu to ensure everything looks correct.
Step 6: Print the Handouts
- Once all settings are adjusted to your preference, click the
Printbutton at the top of the Print menu.
Step 7: Verify Printed Handouts
- After printing, verify that the handouts have printed correctly.
- Check for correct orientation, slide order, and completeness.
Step 8: Distribute the Handouts
- Distribute the printed handouts to your audience as needed.
- You can also save the handouts as a PDF for digital distribution by selecting
Print>Microsoft Print to PDF(or equivalent) instead of a physical printer.
Unlock incredible deals on Office Keys at the lowest prices available exclusively on our website!

