How do you use the Navigation Pane in Word?
The Navigation Pane in Microsoft Word is an incredibly handy tool that makes navigating through your document a breeze, especially for lengthy documents. Whether you are a student, a writer, or a professional, understanding how to use this feature can significantly enhance your productivity. In this blog post, we’ll go through step-by-step instructions on how to activate and utilize the Navigation Pane effectively in Word.
Step 1: Opening Your Document
- Open Microsoft Word: Launch Microsoft Word on your computer.
- Open Your Document: Click on
File>Openand select the document you wish to work on.
Step 2: Showing the Navigation Pane
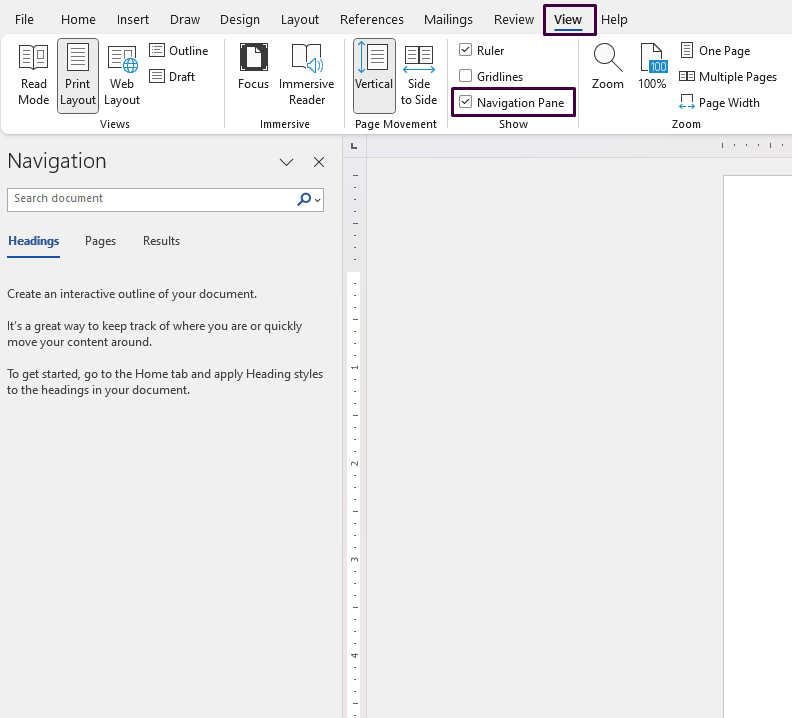
- Go to the View Tab:
- Once your document is open, navigate to the
Viewtab in the Ribbon at the top of the screen.
- Once your document is open, navigate to the
- Check the Navigation Pane Box:
- In the
Showgroup, check the box labeledNavigation Pane.
- In the

Step 3: Understanding the Navigation Pane Layout
The Navigation Pane will appear on the left side of your screen. It consists of three main sections:
- Headings: Displays a list of document headings.
- Pages: Shows thumbnails of each page.
- Results: Displays search results within the document.
Step 4: Using the Headings Tab
- Structuring Your Document with Headings:
- Use Word’s built-in styles (
Home>Styles) to format your headings. This allows the Navigation Pane to recognize sections of your document.
- Use Word’s built-in styles (
- Navigating Using Headings:
- Click on any heading in the
Headingstab to jump directly to that section in your document. This is particularly useful for lengthy documents with multiple sections.
- Click on any heading in the
Step 5: Utilizing the Pages Tab
- Viewing Page Thumbnails:
- Click on the
Pagestab in the Navigation Pane to see thumbnails of each page in your document.
- Click on the
- Navigating Between Pages:
- Click on any thumbnail to instantly scroll to that page in the main document window.
Step 6: Searching with the Results Tab
- Conducting a Search:
- Type a keyword or phrase into the
Searchbox at the top of the Navigation Pane.
- Type a keyword or phrase into the
- Viewing Search Results:
- The
Resultstab will automatically highlight and list all occurrences of the searched term in your document.
- The
- Navigating Search Results:
- Click on any search result to be taken directly to that location in the document.
Step 7: Rearranging Sections via the Headings Tab
- Expanding and Collapsing Headings:
- Click on the small triangle next to a heading to expand or collapse its subheadings.
- Drag-and-Drop Headings:
- Click and hold on a heading, then drag it up or down to rearrange the order of sections in your document. The content under each heading will move along with it.
Step 8: Additional Tips for Mastering the Navigation Pane
- Creating a Table of Contents:
- Go to
References>Table of Contents. This is a powerful way to create a clickable table of contents based on the headings structure defined in the Navigation Pane.
- Go to
- Using Outline View:
- Enable
Outline ViewviaView>Outline. This allows you to view and manage your document structure more efficiently and can be complemented with the Navigation Pane.
- Enable
- Customizing Heading Styles:
- Go to
Home>Stylesand right-click on a style to modify its appearance. This customizes how headings appear both in your document and in the Navigation Pane.
- Go to
Purchase genuine Office Keys on our website for unbeatable prices and instant delivery!

