Microsoft Word is not just a word processing tool; it also offers robust features for aligning and distributing objects like shapes, images, and text boxes. Whether you are designing a newsletter, creating a flyer, or simply organizing document elements, mastering these features can make your work cleaner and more professional. In this blog post, we will guide you through the process of aligning and distributing objects in Word step by step.
Step 1: Inserting Objects
- Open Microsoft Word:
- Launch the Word application on your computer.
- Open or Create a Document:
- Open an existing document via
File>Open, or create a new one by selectingFile>New.
- Open an existing document via
- Insert Objects:
- Go to the
Inserttab in the Ribbon. - Select the type of object you want to insert, such as images (
Pictures), shapes (Shapes), or text boxes (Text Box).
- Go to the
Step 2: Selecting Objects
- Select a Single Object:
- Click on the object you want to select.
- Select Multiple Objects:
- Hold down the
Shiftkey and click on each object you want to select. Alternatively, click and drag your mouse to form a selection box around the objects.
- Hold down the
Step 3: Aligning Objects
- Access the Align Options:
- With the objects selected, go to the
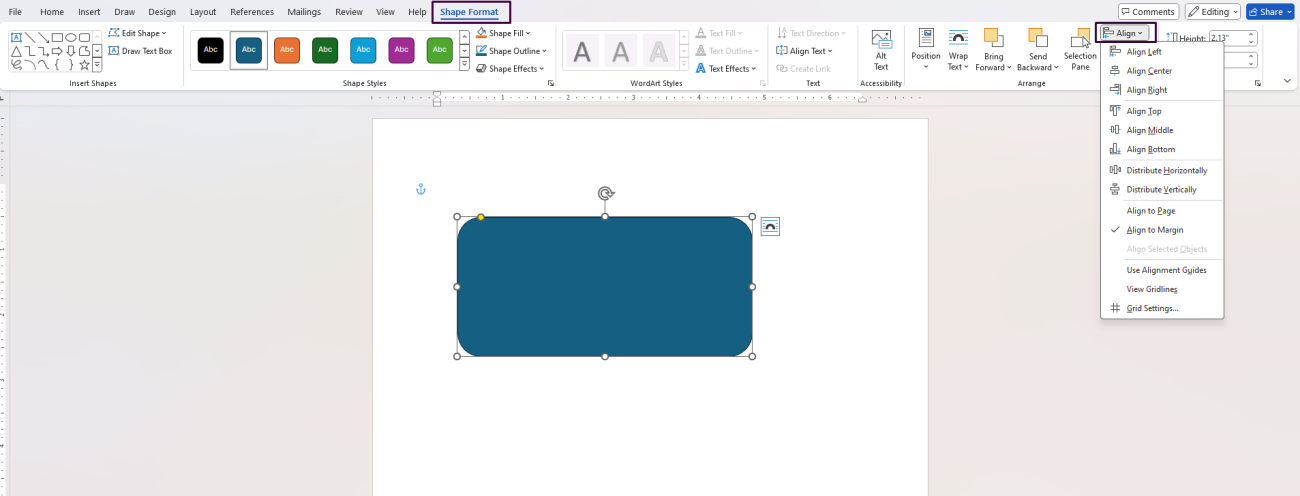
Formattab in the Ribbon (this may appear asPicture Format,Drawing Tools Format, orShape Formatdepending on the object type).
- With the objects selected, go to the
- Open the Align Menu:
- In the
Arrangegroup, click on theAligndropdown menu.
- In the
- Choose an Alignment Option:
- Align Left: Aligns the selected objects to the left.
- Align Center: Aligns the selected objects to the center.
- Align Right: Aligns the selected objects to the right.
- Align Top: Aligns the selected objects to the top.
- Align Middle: Aligns the selected objects to the middle.
- Align Bottom: Aligns the selected objects to the bottom.

Step 4: Distributing Objects
- Access the Distribute Options:
- With the objects selected, return to the
Aligndropdown menu in theFormattab.
- With the objects selected, return to the
- Choose a Distribution Option:
- Distribute Horizontally: Distributes the selected objects equally across the horizontal axis.
- Distribute Vertically: Distributes the selected objects equally across the vertical axis.
Step 5: Using Grid and Guidelines
- Access Grid and Guidelines:
- Go to the
Viewtab in the Ribbon. - Check the box for
Gridlinesin the Show group to display a grid pattern on your document.
- Go to the
- Snap to Grid:
- Still in the
Viewtab, click on theDialog Box Launcher(small arrow) in theShowgroup to open theGrid and Guidesdialog. - Check the box for
Snap objects to grid when the gridlines are not displayed. This feature helps objects align more precisely based on the grid.
- Still in the
Step 6: Grouping Objects
- Select Multiple Objects:
- Hold down the
Shiftkey and click on each object you want to group.
- Hold down the
- Group the Selected Objects:
- Navigate to the
Formattab in the Ribbon. - In the
Arrangegroup, click on theGroupdropdown menu and selectGroup. The objects will now move and align as a single unit.
- Navigate to the
Step 7: Fine-Tuning Alignment
- Nudge Objects:
- Select the object, then use the arrow keys on your keyboard to nudge the object in small increments.
- Use the Ruler:
- Ensure the ruler is visible (
Viewtab >Ruler). Drag objects to align them precisely using the ruler as a guide.
- Ensure the ruler is visible (
Step 8: Additional Tips
- Align to Margin/Page:
- While in the
Aligndropdown menu, selectAlign to MarginorAlign to Pageto align objects relative to the page layout.
- While in the
- Align Using Shapes:
- Draw temporary shapes (like lines or rectangles) to act as alignment guides. You can delete these shapes after aligning your objects.
Purchase genuine Office Keys on our website for unbeatable prices and instant delivery!


