How to Create a Drop-down List with Options in Microsoft Word?
Creating a drop-down list with options in Microsoft Word can be incredibly useful for creating forms, surveys, or templates where users can select from predetermined choices. By providing a drop-down list, you can ensure consistent and accurate data entry, making it easier for users to select options instead of typing them manually. In this guide, we will explore how to create a drop-down list with options in Microsoft Word, empowering you to create interactive and user-friendly documents.
Microsoft Word offers a simple and intuitive way to create drop-down lists with options, allowing you to tailor your documents to suit your specific needs. Whether you are creating a form for data collection or a template with predefined choices, the drop-down list feature in Word can enhance the functionality and usability of your document.
Step 1: Open Microsoft Word
- Launch Microsoft Word on your computer.
Step 2: Insert a Form Control
- Go to the “Developer” tab, which may not be visible by default. If it’s not showing, enable it by right-clicking on the ribbon, selecting “Customize the Ribbon,” and checking the “Developer” box.
- In the “Controls” group, click on the “Legacy Tools” button.
- From the drop-down menu, select “Drop-Down Form Field.”
Step 3: Customize the Form Control
- With the drop-down form field selected, click on the “Properties” button in the “Controls” group.
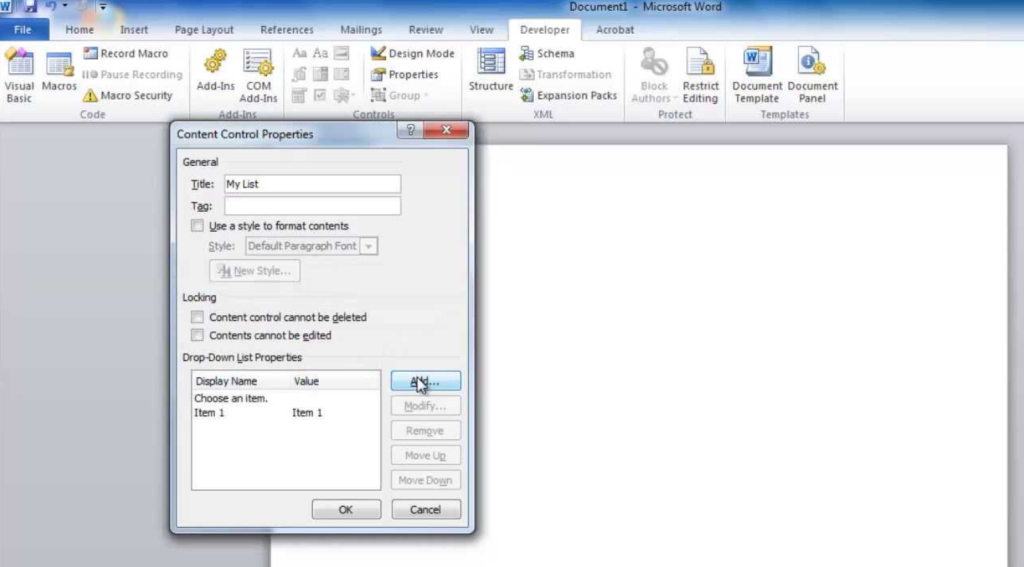
- In the “Content Control Properties” dialog box, you can customize the properties of the drop-down list.
- Under the “Drop-down List Properties” section, enter the options you want to include, each on a separate line.
- Click “OK” to save the changes.

Step 4: Insert the Drop-down List in the Document
- Place the cursor where you want the drop-down list to appear in your document.
- Click on the “Drop-Down Form Field” control from the “Controls” group on the “Developer” tab.
- The drop-down list will be inserted at the cursor location.
Step 5: Add Text or Instructions
- To provide instructions or context for the drop-down list, simply type or paste text above or below the control.
Step 6: Protect the Document (optional)
- To prevent accidental changes to the drop-down list, you can protect the document.
- Go to the “Developer” tab, click on the “Protect Document” button in the “Protect” group, and choose “Restrict Formatting and Editing.”
- Enable “Allow only this type of editing” and select “Filling in forms” from the drop-down list.
- Click “Yes, Start Enforcing Protection” and set a password if desired.
Step 7: Test the Drop-down List
- Save and close the document.
- Re-open the document and test the drop-down list by selecting various options from the list.
Conclusion:
By following these step-by-step instructions, you can easily create a drop-down list with options in Microsoft Word. Simplify data entry and create custom forms for improved organization and efficiency.
Get the best deal on Microsoft Office with the lowest price available on our website today and start boosting your productivity!

