How to Remove Backgrounds from Images in Word?
Adding images to your Word document enhances visual appeal, but sometimes, you may need to remove the background from an image to make it blend seamlessly with your content. Whether you’re preparing a report, presentation, or professional document, Microsoft Word provides a built-in tool that allows you to remove backgrounds from images without needing external software like Photoshop. In this guide, we’ll walk you through how to remove backgrounds from images in Microsoft Word with just a few clicks.
Why Remove Backgrounds from Images in Word?
There are several reasons why you might want to remove a background from an image in Word:
✅ Create professional-looking documents – Makes your images look cleaner and more integrated into your document.
✅ Focus on the subject – Eliminates distractions by removing unnecessary backgrounds.
✅ Enhance design flexibility – Makes it easier to overlay images on different backgrounds or mix with text.
✅ No need for extra software – Saves time and effort by using Word’s built-in tools instead of external graphic design software.
Step-by-Step Guide to Removing Backgrounds in Word
Follow these simple steps to remove the background from an image directly in Microsoft Word:
Step 1: Insert Your Image
1️⃣ Open Microsoft Word and navigate to the document where you want to add an image.
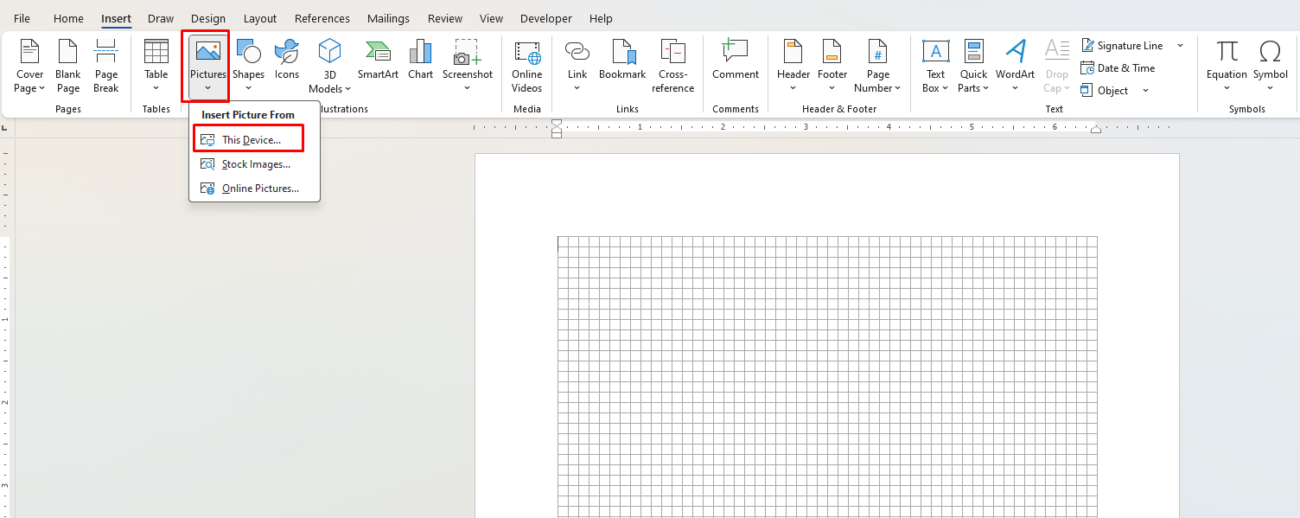
2️⃣ Click on the Insert tab in the ribbon.
3️⃣ Select Pictures and choose This Device to upload an image from your computer.
4️⃣ Once inserted, click on the image to select it.

Step 2: Open the Background Removal Tool
1️⃣ With the image selected, go to the Picture Format tab (this appears when an image is clicked).
2️⃣ Click Remove Background on the left side of the ribbon.
3️⃣ Word will now automatically detect the background and highlight it in purple/magenta, indicating the areas that will be removed.

Step 3: Adjust the Background Removal Selection
Sometimes, Word may not accurately detect the background, so you might need to manually refine the selection.
✅ Mark Areas to Keep: Click Mark Areas to Keep, then draw over parts of the image that you want to retain.
✅ Mark Areas to Remove: Click Mark Areas to Remove to highlight areas that Word didn’t automatically detect as the background.
✅ Drag Selection Box: Adjust the selection box around the image to refine the detected background.

Step 4: Apply and Finalize the Changes
1️⃣ Once you’re satisfied with the selection, click Keep Changes to remove the background.
2️⃣ The background will be removed, leaving only the subject of the image.
3️⃣ If you’re not happy with the results, click Reset Picture and try again.
Step 5: Save or Export Your Edited Image (Optional)
If you’d like to save the image with a transparent background for use elsewhere:
1️⃣ Right-click the edited image.
2️⃣ Select Save as Picture.
3️⃣ Choose PNG format (this preserves transparency).
4️⃣ Click Save.
Tips for Better Background Removal in Word
🔹 Use High-Contrast Images: The tool works best when there’s a clear distinction between the foreground (subject) and background.
🔹 Refine with Manual Adjustments: If the automatic selection isn’t perfect, use the Mark Areas to Keep/Remove tools.
🔹 Experiment with Image Placement: Once the background is removed, try adding the image over different colored backgrounds or texts for better visibility.
Get the cheapest Microsoft Office keys with instant delivery and secure activation—save big on genuine Office licenses today!

