How to Use Citation and Bibliography Tools in Microsoft Word?
Managing citations and bibliographies can be a daunting task, especially when you’re juggling multiple sources for research papers, reports, or any scholarly work. Fortunately, Microsoft Word offers robust tools to streamline this process, making it easier to keep track of your sources and format your references correctly.
In this blog post, we’ll walk you through the steps to effectively use citation and bibliography tools in Microsoft Word.
Step 1: Open Your Document
Begin by launching Microsoft Word and opening the document where you need to add citations and a bibliography. Whether you’re working on a research paper, an academic article, or a project report, make sure your document is ready for citation management.
Step 2: Navigate to the References Tab
The citation and bibliography tools are located in the References tab on the Ribbon at the top of the window. Click on the References tab to access the tools you’ll need for managing citations and creating a bibliography.
Step 3: Choose Your Citation Style
Before you start adding citations, you need to select your preferred citation style. In the Citations & Bibliography group within the References tab, you’ll find a dropdown menu labeled Style. Common styles include APA, MLA, and Chicago. Choose the style that aligns with the requirements of your document or the guidelines provided by your institution.

Step 4: Add a New Citation
To add a citation, click on Insert Citation in the Citations & Bibliography group and select Add New Source. A dialog box will appear where you can input the details of your source.
- Select the Type of Source: Choose from options like book, journal article, website, etc., from the
Type of Sourcedropdown menu. - Enter Source Details: Fill in the required fields such as author, title, year of publication, and other relevant information.
- Save the Citation: Click
OKto insert the citation into your document. Word will format it according to the citation style you selected.

Insert Citation in WordStep 5: Manage Your Sources
To view, edit, or organize your sources, click Manage Sources in the Citations & Bibliography group. This opens the Source Manager, where you can:
- Edit Existing Sources: Click on a source to modify its details.
- Add New Sources: Click
Newto add additional sources. - Copy Sources: Transfer sources between your document and a master list for future use.
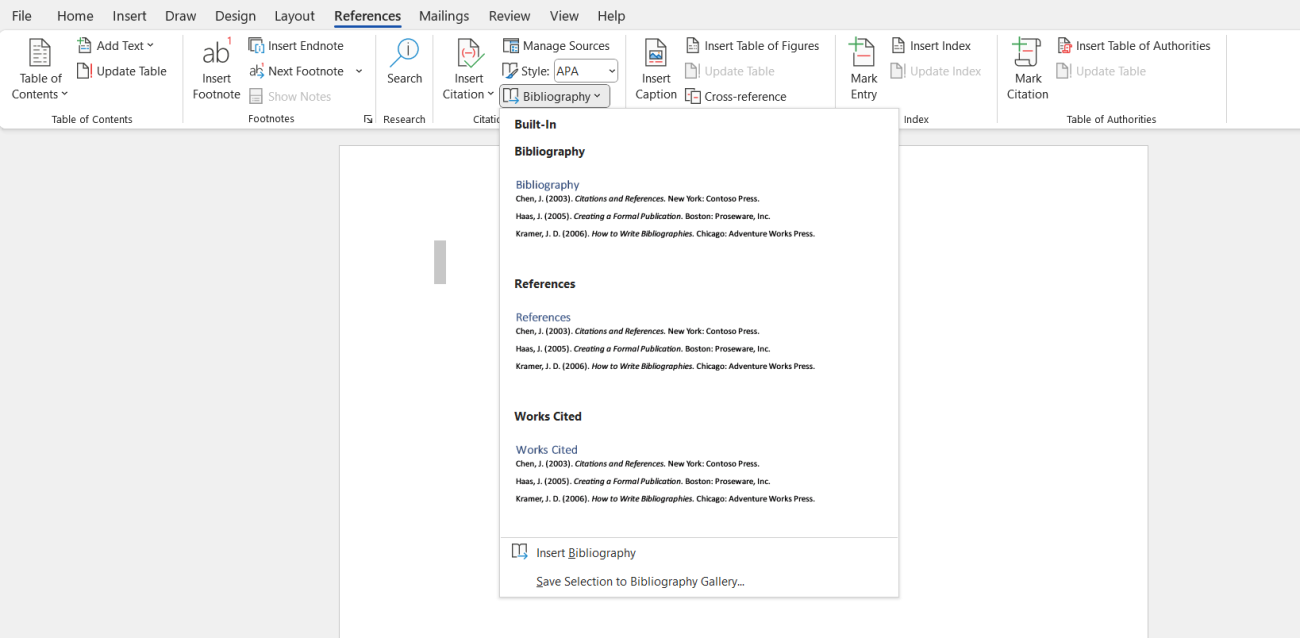
Step 6: Insert a Bibliography
Once you’ve added citations throughout your document, it’s time to create a bibliography. Place your cursor where you want the bibliography to appear, usually at the end of your document.
- Insert Bibliography: Click
Bibliographyin theCitations & Bibliographygroup. - Choose a Format: Select one of the available bibliography styles. Word will generate a bibliography based on the sources you’ve cited in your document.

Step 7: Update Citations and Bibliography
If you add or remove sources, you’ll need to update your bibliography to reflect these changes. Click on the bibliography in your document and then select Update Citations and Bibliography. This ensures that all citations and the bibliography are accurate and up-to-date.
Step 8: Use Citation and Bibliography Tools for Revisions
Throughout the writing process, you might need to add, remove, or change citations. Utilize the Insert Citation tool to add new sources or the Manage Sources tool to make adjustments. Remember to update your bibliography each time you make changes to ensure it reflects the most current information.
Discover unbeatable deals on Microsoft Office with the lowest prices available online—shop now and maximize your savings on essential productivity software!

