Tips for Seamless Collaboration on Presentations in PowerPoint
Creating a compelling presentation in PowerPoint often requires the combined effort of multiple people, whether it’s brainstorming ideas, editing slides, or refining content. Seamless Collaboration work can be challenging if you’re not equipped with the right tools and strategies, especially when team members are working remotely or across different time zones. Fortunately, PowerPoint offers a range of features designed to enhance collaboration and ensure that everyone can contribute efficiently without stepping on each other’s toes.
In this blog, we’ll share some useful tips for seamless collaboration on PowerPoint presentations, helping your team work together more effectively and create high-quality, polished presentations.
1. Leverage Co-Authoring for Real-Time Collaboration
One of the most powerful features for collaboration in PowerPoint is co-authoring, which allows multiple users to edit the presentation at the same time. Whether your team is working together in the same room or remotely, co-authoring enables everyone to see real-time changes and updates.
How to Use Co-Authoring:
- Save to OneDrive or SharePoint: To enable co-authoring, save your presentation to the cloud (OneDrive or SharePoint). This ensures that all changes are synchronized and visible to everyone in real-time.
- Share the File: Use the Share button in the top-right corner to invite collaborators. You can choose whether to allow them to edit or just view the file.
- Simultaneous Edits: As you and your collaborators edit different slides, PowerPoint will highlight the changes being made by each person. You’ll see their name and cursor color, helping you stay on track.
With co-authoring, you no longer need to email the presentation back and forth, ensuring everyone is working with the most up-to-date version.

2. Use Comments to Facilitate Communication
Effective communication is key to any successful collaboration. PowerPoint allows users to add comments directly to slides, making it easier to discuss specific points, suggest changes, or ask for clarification.
How to Use Comments:
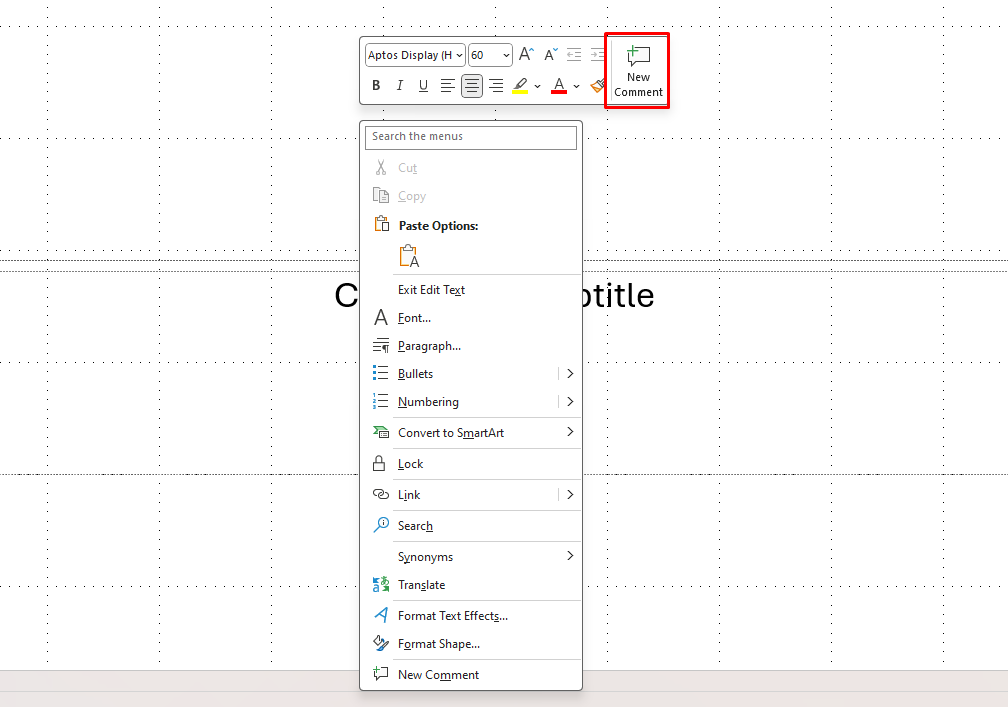
- Insert Comments: To add a comment, right-click on a slide or text and select New Comment. You can type your feedback or questions and tag specific collaborators by using the @mention feature.
- Resolve Comments: Once a comment has been addressed, the person responsible can mark it as resolved. This keeps the presentation organized and ensures that no issues go unnoticed.
- Threaded Conversations: You can reply to comments, creating a threaded conversation that helps keep discussions organized and focused on specific points.
By using comments, your team can engage in focused discussions directly within the presentation, reducing the need for external emails or meetings.

3. Use Slide Masters for Consistency
When collaborating on a presentation, it’s easy for different team members to introduce inconsistencies in design, fonts, or slide layouts. This can make the final presentation look unprofessional and disjointed. To ensure uniformity, use PowerPoint’s Slide Master feature.
How to Use Slide Masters:
- Access Slide Master: Go to the View tab and select Slide Master. Here, you can set the overall layout, design, fonts, and colors for your entire presentation.
- Create a Unified Template: Once you’ve designed your slide master, all team members will be able to apply the same layout and design, ensuring that the presentation has a cohesive and polished look.
- Standardize Elements: You can add logos, footers, and other common elements that should appear on every slide. This makes it easy for everyone to stay consistent with formatting.
By using Slide Masters, you can make sure that all collaborators adhere to the same visual style, reducing errors and saving time on formatting.

4. Version History for Better Tracking
When working collaboratively, it’s easy to lose track of changes or accidentally overwrite important content. PowerPoint’s Version History feature helps you manage different versions of your presentation and recover any previous drafts if needed.
How to Use Version History:
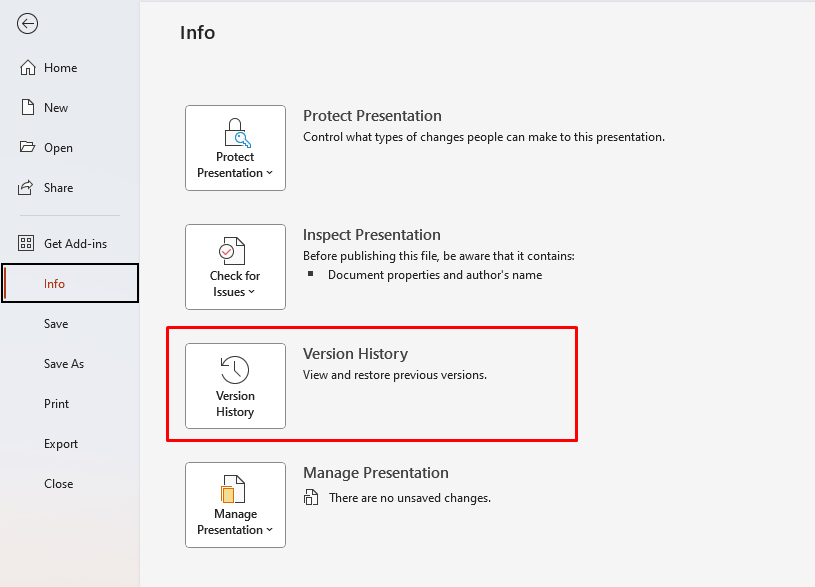
- Access Version History: Click on the File tab, select Info, and choose Version History. Here, you’ll see a list of previous versions of your presentation.
- Restore Previous Versions: If you notice a mistake or want to undo recent changes, you can restore an earlier version of the presentation.
- Compare Versions: You can also compare different versions side by side, making it easy to see what changes were made by different collaborators.
Version History is a lifesaver when working on complex presentations, allowing you to track progress and avoid the risk of losing important content.

5. Enable Automatic Saving with OneDrive
One of the most frustrating aspects of collaboration is losing work due to unexpected issues, like power outages or internet disruptions. By saving your PowerPoint presentation to OneDrive or SharePoint, you can ensure that all changes are saved automatically, minimizing the risk of data loss.
How to Enable AutoSave:
- Save to OneDrive or SharePoint: Ensure your file is saved in the cloud. Once saved, the AutoSave feature will automatically back up your work as you make changes.
- Work Anywhere: You can access and edit the file from any device with OneDrive or SharePoint, ensuring that your collaborators can work remotely without worrying about losing progress.
By enabling AutoSave, you can focus on collaborating rather than constantly saving your work.
6. Set Clear Roles and Responsibilities
When working on a team presentation, it’s important to set clear roles and responsibilities to avoid confusion. Decide who will be responsible for creating slides, designing visuals, writing content, or editing.
How to Set Roles:
- Assign Specific Tasks: Use project management tools, like Microsoft Teams or Trello, to assign specific tasks to each team member. This keeps everyone on track and ensures that no task is overlooked.
- Track Progress: In Teams, you can collaborate on the presentation in real-time, add comments, and keep track of the work completed by each person.
By defining roles clearly, you can avoid overlapping work and ensure that every part of the presentation is handled by the right person.
7. Review and Finalize Together
Once everyone has contributed their part to the presentation, it’s essential to review the slides together to ensure the content flows logically, the design is consistent, and the presentation is polished.
How to Review:
- Host a Virtual Review Meeting: Use Microsoft Teams or Skype to host a virtual meeting and review the presentation together. This allows everyone to discuss their ideas in real-time and make any necessary adjustments.
- Make Final Edits: After the review, finalize any edits and add the finishing touches, such as transitions or animations.
Looking for a reliable and affordable way to get Microsoft Office? Buy the cheapest Office keys today and unlock the full potential of your productivity tools!

