Aligning and arranging objects on slides in Microsoft PowerPoint is essential for creating visually appealing and professional presentations. Proper alignment and arrangement of objects, such as text boxes, shapes, images, and diagrams, can help you achieve a clean and organized layout, ensuring that your message is effectively communicated to your audience. In this guide, we will explore how to align and arrange objects on slides in Microsoft PowerPoint, equipping you with the skills to create visually stunning and well-structured presentations.
When designing slides in PowerPoint, it’s important to ensure that objects are properly aligned and arranged to maintain a consistent and visually pleasing layout. Alignment options allow you to position objects precisely, ensuring they are evenly spaced and aligned with other elements on the slide. Arranging objects enables you to control their stacking order, bringing certain objects to the front or back, and managing their overlapping positions.
Step 1: Select the Objects
- Open your PowerPoint presentation and go to the slide that contains the objects you want to align and arrange.
- Click on the first object you want to align and arrange to select it.
- Hold down the Shift key and click on any additional objects you want to include in the selection.
Step 2: Align Objects
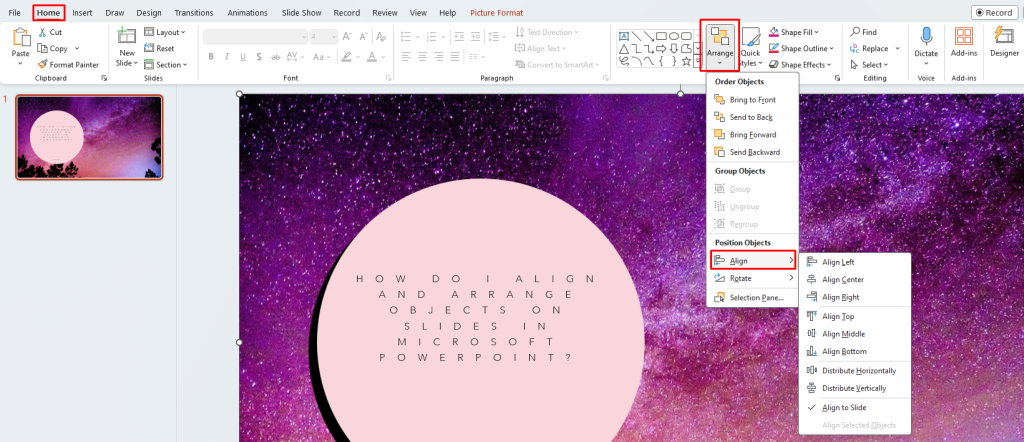
- With the objects selected, go to the Home tab in the top menu.
- Click on the Arrange button, and a dropdown menu will appear.
- In the dropdown menu, click on the Align option.
- Choose from aligning options, such as Align Left, Align Center, or Align Right to align the objects horizontally.
- For vertical alignment, select Align Top, Align Middle, or Align Bottom.

Step 3: Distribute Objects
- To evenly distribute the selected objects horizontally or vertically, go to the Arrange button again.
- Click on the Distribute option in the dropdown menu.
- Select Distribute Horizontally or Distribute Vertically to distribute the objects evenly.
Step 4: Arrange Objects
- In the Arrange dropdown menu, you’ll find several options to arrange objects.
- Choose Bring to Front or Send to Back to change the stacking order of the objects.
- Use Bring Forward or Send Backward to move objects, bringing them forward or backward one step at a time.
- To group multiple objects together, click on the Group button in the Arrange menu. This allows you to move and transform them as a single unit.
Step 5: Resize and Rotate Objects
- To resize an object, click on it to select it, and then click and drag any of the handles surrounding it to adjust its size.
- To rotate an object, click on it to select it, and then use the circular rotation handle at the top of the object to rotate it as desired.
By following these step-by-step instructions, you can easily align, arrange, resize, and rotate objects on slides in Microsoft PowerPoint. Create visually appealing presentations and captivate your audience with professionally arranged objects.
Discover the lowest prices for Microsoft Office on our website as we offer high-quality packages at unbeatable rates.


