Exporting a PowerPoint presentation as a video can be a convenient and versatile way to share your presentation with others. By converting your presentation into a video format, you can ensure that your content is accessible on a wider range of devices and platforms. Whether you want to distribute your presentation online, showcase it on a different operating system, or simply create a self-running slideshow, exporting your PowerPoint presentation as a video provides you with the flexibility and ease of sharing. In this guide, we will explore the step-by-step process of exporting a PowerPoint presentation as a video, empowering users to effectively communicate their ideas and engage their audience.
PowerPoint provides a seamless way to export your presentation as a video, allowing you to retain all the animations, transitions, and timings you have incorporated into your slideshow. By converting your presentation into a video, you can make sure that your audience experiences your slideshow exactly as you intended, regardless of the platform they are using. Additionally, exporting your PowerPoint presentation as a video allows you to customize certain settings such as the video quality, resolution, and even add narration or background music to enhance the viewing experience.
Step 1: Open your PowerPoint presentation
Start by opening the PowerPoint presentation that you want to export as a video. Make sure all your slides and multimedia elements are in place.
Step 2: Go to the “File” menu
Click on the “File” tab in the PowerPoint ribbon. This will open the backstage view.
Step 3: Choose “Export” or “Save As”
In the backstage view, choose either the “Export” or “Save As” option. The name may vary depending on your PowerPoint version.

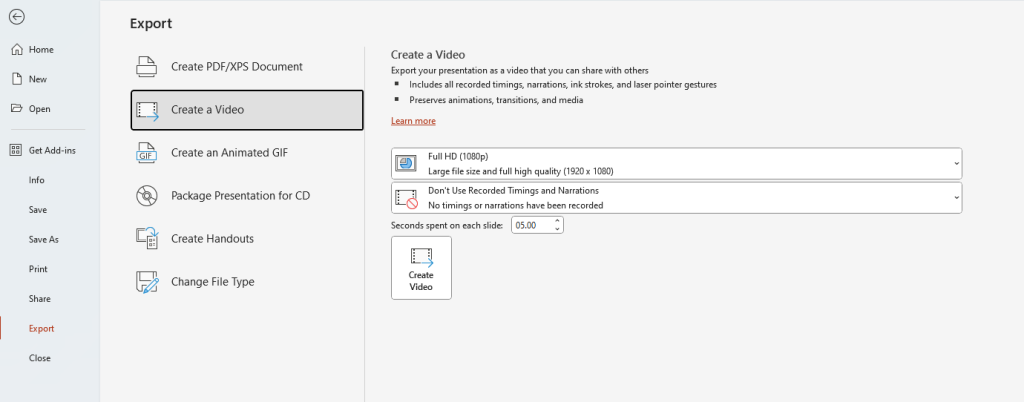
Step 4: Select “Create a Video”
Look for the option that says “Create a Video” and click on it. You may need to choose a specific video format or quality option, depending on your preferences.

Step 5: Choose the video settings
In the video settings dialog box, you can specify the video quality, timing of slide transitions, and narration or timings settings. Adjust these settings according to your needs.
Step 6: Select “Create Video”
Once you’ve configured the video settings, click on the “Create Video” button or a similar option. Choose a location on your computer where you want to save the video file.
Step 7: Wait for the export process
PowerPoint will then start converting your presentation into a video file. The time it takes to complete the export process depends on the size and complexity of your presentation.
Step 8: Open the exported video
Once the export process is finished, navigate to the location where you saved the video file. Double-click on it to open and verify that the video plays as expected.
Now you have successfully exported your PowerPoint presentation as a video. You can now share it easily with others, whether through email, file sharing services, or uploading it to a video hosting platform.
Get Microsoft Office at the lowest price available on our website. Don’t miss out on this amazing deal!

