Using Macros in Word to Speed Up Document Processing
When creating presentations, whether for business meetings, educational purposes, or client pitches, the speed and efficiency with which you process and organize information can make all the difference. While PowerPoint is where the magic happens in terms of visual appeal, much of the groundwork for effective presentations begins in Word—especially if you’re dealing with large documents, reports, or data sets.
One powerful tool that can help you speed up document processing in Word is macros. Macros allow you to automate repetitive tasks, save time, and reduce errors, making your workflow smoother and more efficient. By using macros, you can create and format content quickly, which can then be easily transferred to PowerPoint for your presentations.
In this blog, we’ll explore how macros work in Word, how you can use them to speed up document processing, and how this can ultimately enhance your PowerPoint presentations.
1. What Are Macros in Word?
A macro in Microsoft Word is a sequence of commands and instructions that you can group together to perform a task automatically. Think of it as a shortcut for tasks you perform repeatedly. For example, if you often need to format text, add headings, or apply certain styles, a macro can do that for you with just a click of a button.
Macros are written in VBA (Visual Basic for Applications), a programming language that allows you to automate complex tasks. Though VBA might sound intimidating at first, don’t worry—basic macros can be created with little to no coding experience.

2. Why Use Macros in Word for Document Processing?
If you’re working with large documents or need to prepare content for PowerPoint slides, you’ll quickly realize that automating some tasks in Word can save you a lot of time. Here are a few benefits of using macros:
- Automation of Repetitive Tasks: Instead of manually formatting, styling, or editing sections of your document over and over again, you can create a macro that does the job for you automatically.
- Consistency: Macros help ensure your document formatting is consistent throughout, reducing human error and ensuring a uniform look in your PowerPoint slides.
- Efficiency: Tasks that would normally take hours can be done in seconds, freeing up time for the creative aspects of your presentation design.
For example, if you have a Word document with multiple sections (headings, subheadings, and body text) that need to be formatted uniformly, a macro can do this with one click, ensuring everything looks consistent before transferring it to PowerPoint.
3. How to Create and Use Macros in Word
Creating a macro in Word may sound complicated, but it’s simpler than you might think. Here’s a basic guide on how to create and use macros to speed up document processing:
Step 1: Enable the Developer Tab
To start creating macros, you need to enable the Developer tab in Word. This tab contains all the tools necessary for working with macros.
- Go to the File tab and click on Options.
- In the Word Options window, select Customize Ribbon.
- On the right-hand side, check the box next to Developer and click OK.
Step 2: Record a Macro
Now that the Developer tab is visible, you can start recording a macro.
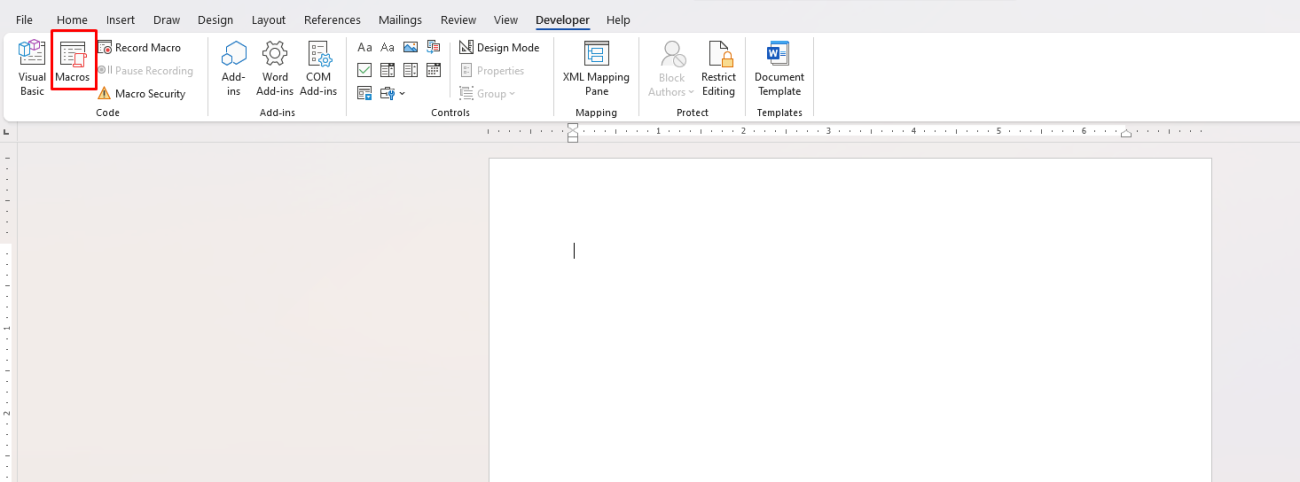
- Click on the Developer tab and then click Record Macro.
- Name your macro (e.g., “FormatHeadings”) and choose where to store it (either in the current document or in the Normal.dotm template for use across all documents).
- Choose a button or keyboard shortcut to assign the macro to.
- Click OK to start recording.
While recording, perform the actions that you want to automate—such as formatting headings, applying bold, or changing font sizes. Once finished, click Stop Recording.

Step 3: Run the Macro
To run the macro, simply click on the button or use the keyboard shortcut you assigned. Word will automatically repeat the actions you recorded, applying them to your document instantly.
Pro Tip: You can assign macros to buttons in the Word ribbon for quick access, or use keyboard shortcuts to run them even faster.
Step 4: Edit the Macro (Optional)
If you’re comfortable with coding, you can edit the macro using VBA to create more advanced scripts and customize its behavior. To do this, go to the Developer tab, click on Macros, select the macro you want to edit, and click Edit. This opens the VBA editor where you can fine-tune your macro.
4. Practical Uses of Macros in Word for PowerPoint Preparation
Now that you know how to create a macro, let’s look at some practical ways macros can help speed up your document processing, especially when preparing content for your PowerPoint presentations.
1. Formatting Headings and Subheadings
If your PowerPoint presentation involves presenting data from a Word document, you’ll likely need to format the document first. A macro can quickly apply specific heading styles (Heading 1, Heading 2) across the entire document, ensuring a clean and structured document to easily extract the right information for your slides.
2. Bullet Points and Lists
When transferring information from Word to PowerPoint, bullet points are often the go-to method for organizing content. A macro can automatically apply consistent bullet point styles to sections of text in your document. This not only saves time but ensures your content is easy to copy-paste into PowerPoint with minimal formatting adjustments.
3. Inserting and Formatting Tables
Tables are common in both Word and PowerPoint, and formatting them correctly can be time-consuming. A macro can automate the process of adjusting column widths, applying table styles, and ensuring the table looks uniform before copying it into your PowerPoint presentation.
4. Inserting Headers and Footers
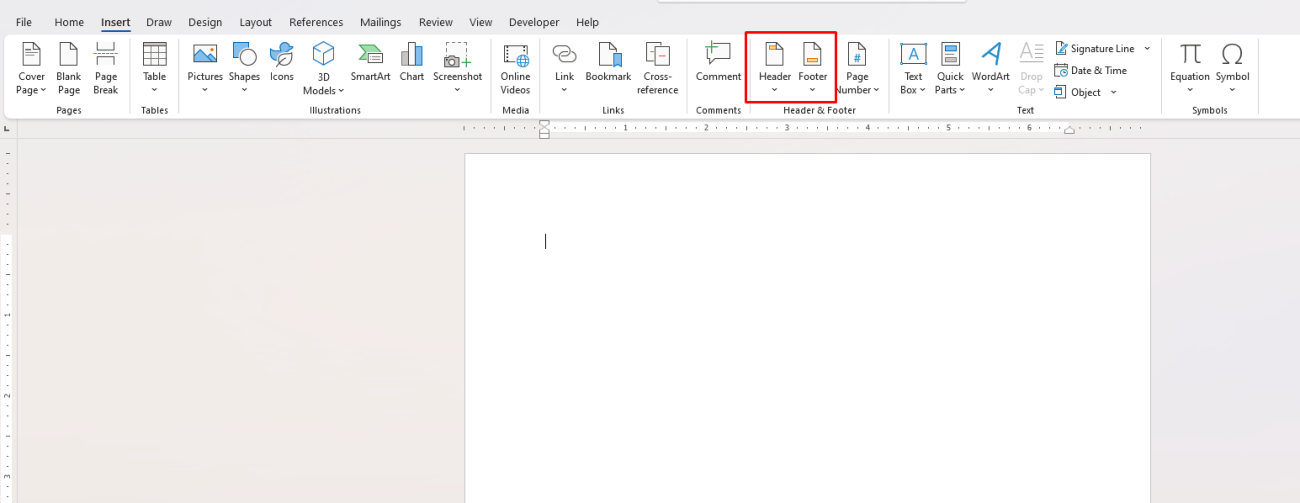
Headers and footers help give your document a professional look. If you need to insert the same header or footer across multiple pages in a report, a macro can quickly insert them in the right place, saving you time and effort.

5. Converting Text to Uppercase or Lowercase
PowerPoint presentations often require certain text to be in all caps for emphasis or readability. A macro can help you quickly convert selected text in Word to uppercase or lowercase, making the process of finalizing slide titles or headers faster.
5. Using Macros in Word to Streamline Your PowerPoint Workflow
When preparing for a presentation, you often have to move between Word and PowerPoint to prepare your content. By using macros in Word, you can streamline the process and make sure the text you copy-paste into PowerPoint is well-formatted and polished.
Here’s how macros help with your workflow:
- Create Your Content in Word: Use macros to quickly format your content (headings, bullet points, tables).
- Copy-Paste to PowerPoint: Copy the formatted content from Word and paste it directly into PowerPoint.
- Consistency: Ensure all your slides follow a consistent format by applying macros to your Word document, which will directly carry over when transferring to PowerPoint.
Get the cheapest Office keys available, offering genuine software at unbeatable prices for all your productivity needs.

