The Design Checker in Publisher is a powerful tool that allows users to ensure the accuracy and quality of their publications before printing or sharing them. With the Design Checker, users can scan their publication for potential errors, inconsistencies, and design issues, helping to eliminate mistakes and improve the overall professional appearance of the publication. In this guide, we will explore how to effectively use the Design Checker in Publisher, providing step-by-step instructions and practical tips to help users create error-free and visually appealing publications.
The Design Checker in Publisher performs a comprehensive scan of the publication, checking for common design mistakes such as text overflow, unlinked images, mismatched fonts, inconsistent formatting, and more. It provides users with a detailed report highlighting any issues found, allowing them to easily identify and rectify errors. Additionally, the Design Checker offers suggestions and recommendations to improve the design and layout of the publication, enhancing its visual appeal and readability.
Step 1: Launch Publisher
Open Microsoft Publisher on your computer and open the publication that you want to check for errors.
Step 2: Access the Design Checker
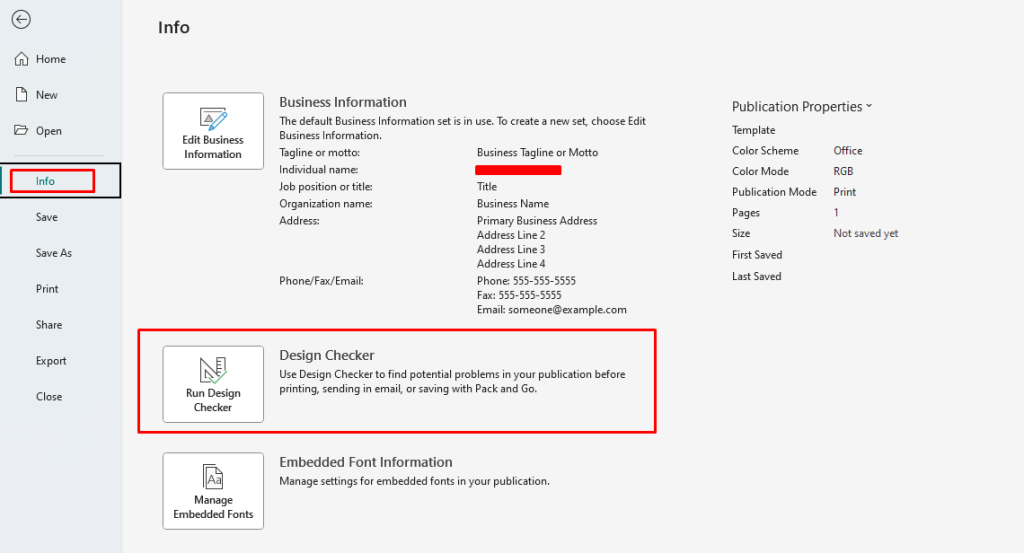
Click on the “File” tab at the top left corner of the Publisher window, then select “Info” from the menu. In the Info pane on the right-hand side, click on the “Design Checker” button.

Step 3: Run the Design Checker
In the Design Checker pane that appears on the right side of the Publisher window, click on the “Start Checking” button to run the Design Checker.
Step 4: Review the Design Checker Results
After the Design Checker has finished scanning your publication, it will display a list of potential issues and errors. Click on each item in the list to view the details and suggested fixes for that particular issue.
Step 5: Resolve the Identified Issues
For each issue identified by the Design Checker, follow the suggested fixes or apply your own corrections to resolve the problem. This may involve adjusting layout or formatting, fixing text errors, or replacing low-resolution images.
Step 6: Use the “Fix” Button
In some cases, the Design Checker will provide a “Fix” button next to an issue. Clicking on this button will automatically apply the suggested fix, saving you time and effort in resolving the issue.
Step 7: Verify the Corrections
Once you have made the necessary corrections, review your publication to ensure that the identified issues have been resolved and that the publication is error-free.
Step 8: Re-run the Design Checker (Optional)
If you made significant changes or additional modifications after the initial Design Checker scan, it is recommended to re-run the Design Checker to ensure that no new errors were introduced.
Step 9: Save and Share the Error-free Publication
Once you are satisfied that all issues have been resolved and the publication is error-free, save your work and share it confidently. Your publication is now ready for printing or digital distribution.
By following these step-by-step instructions, you can effectively use the Design Checker to ensure that your publication is error-free and polished, providing a professional and impressive result.
Find the ideal Publisher license on our website, where you can choose from a range of options such as Office 2016 License, Office 2019 License, and Office 2021 License, catering to your specific database management requirements.


