Inserting a text box with dynamic content in Microsoft Word can be a powerful way to enhance your document design and flexibility. By using dynamic content, you can create text boxes that automatically update with real-time information, such as the current date, page numbers, or other variable data. In this guide, we will explore how to insert a text box with a dynamic content in Microsoft Word, empowering you to create visually appealing and dynamically updated documents.
Traditional text boxes in Word are static, meaning that once inserted, their content remains unchanged. However, by utilizing dynamic content, you can create text boxes that adapt to changes in your document, saving you time and effort in manually updating information. Whether you are working on a report, a newsletter, or any document that requires up-to-date and customizable information, using text boxes with dynamic content can greatly enhance both the aesthetics and practicality of your Word document. This guide will walk you through the process of inserting a text box with dynamic content in Word.
Step 1: Launch Microsoft Word and Open Your Document
- Open Microsoft Word on your computer.
- Open the document where you want to insert the text box with dynamic content.
Step 2: Access the Insert Tab
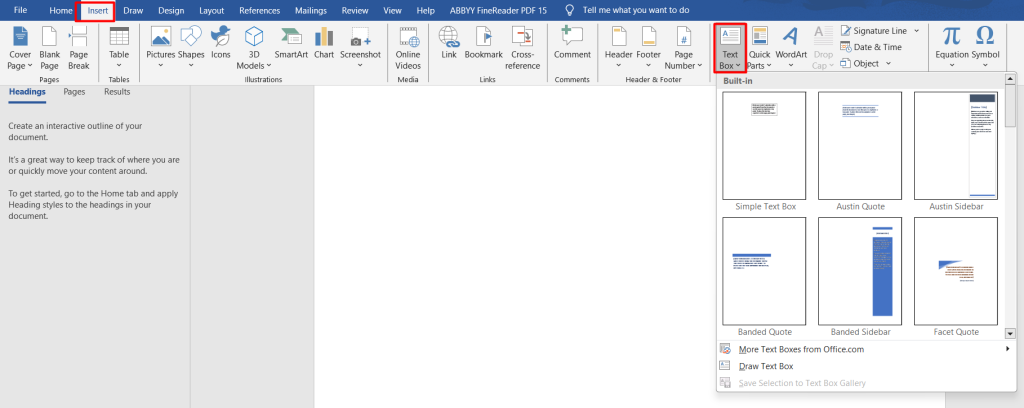
- Click on the “Insert” tab at the top of the Word window.
Step 3: Insert a Text Box
- In the “Text” group, click on the “Text Box” button.
- A dropdown menu will appear. Select the desired text box style from the provided options.
- Click on the location in your document where you want to insert the text box.
- A default text box will appear in your document.

Step 4: Add Dynamic Content to the Text Box
- Double-click inside the text box to activate the text editing mode.
- Begin typing or paste the desired content into the text box.
- Format the text as desired using the formatting options in the “Home” tab.
- To add dynamic content, click on the “Insert” tab and select the appropriate option(s).
- For date and time: Click on the “Date & Time” button and choose the format you prefer.
- For page numbers: Click on the “Page Number” button and select the desired page number style.
- For other dynamic content: Explore the “Quick Parts” and “Field” options to add features like document properties, headers, footers, etc.
Step 5: Customize the Text Box
- Select the text box by clicking on its border or inside the text box.
- Use the formatting options in the “Format” tab to customize the appearance of the text box.
- Adjust the size, position, color, and other visual aspects according to your preferences.
Step 6: Arrange and Align the Text Box
- To move the text box, click inside the box and drag the text box to the desired location.
- Use the alignment tools in the “Format” tab to align the text box with the rest of your document’s content.
Step 7: Save Your Document
- Once you are satisfied with the text box and its dynamic content, save your document.
By following these steps, you can easily insert a text box with dynamic content in Microsoft Word. This feature allows you to create more engaging documents that display real-time information, such as dates, page numbers, and other dynamic elements. Start enhancing your documents with dynamic text boxes today!
Get the best deal on Microsoft Office with the lowest price available on our website today and start boosting your productivity!

