Inserting a page number in the footer starting from the second page in Microsoft Word is a common formatting technique that users often require for academic or professional documents. Typically, the first page of a document requires a different page number format, such as a title page or cover page, and the following pages require numbering to facilitate navigation and reference. In this guide, we will explore step-by-step instructions on how to insert a page number in the footer starting from the second page in Microsoft Word, allowing users to create a polished and professional document.
Microsoft Word offers several options to add page numbers to the footer, including the ability to customize the page number’s format, font, size, position, and alignment. By using the “Page Number” feature in the “Insert” tab, users can add a page number to the footer section of their document, and Word automatically numbers the pages consecutively. However, starting the page numbering on the second page, while excluding the first page, requires additional formatting steps.
Step 1: Launch Microsoft Word and Open your Document:
- Open Microsoft Word on your computer.
- Open the document in which you want to insert page numbers.
Step 2: Access the Footer:
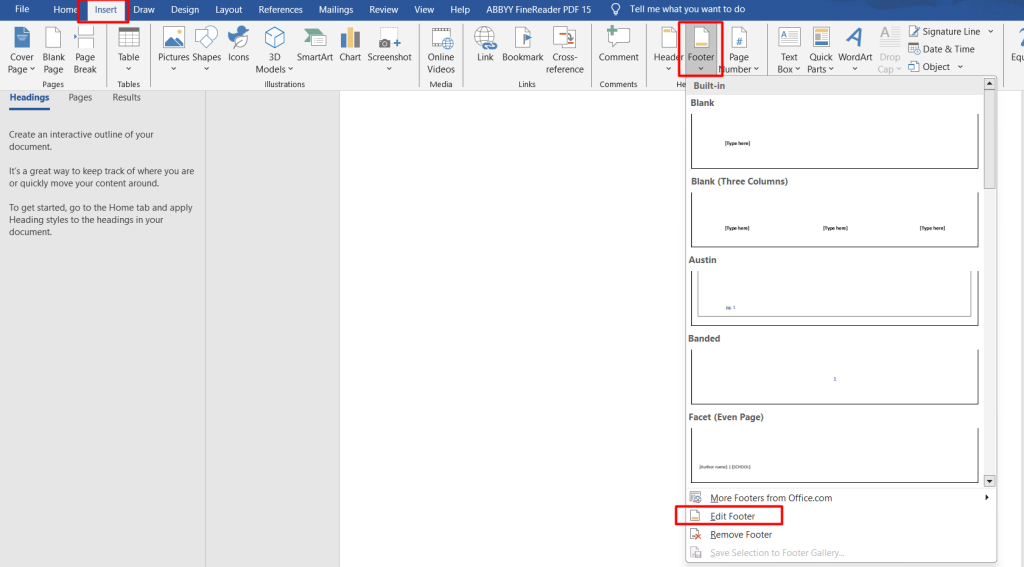
- Go to the “Insert” tab in the menu bar at the top of the screen.
- Click on the “Footer” icon.
- Choose the “Edit Footer” option.

Step 3: Switch to “Different First Page” Footer:
- In the “Header & Footer Tools” tab that appears after selecting “Edit Footer,” you will see a “Design” tab.
- Click on the “Design” tab.
- In the “Navigation” group, check the box that says “Different First Page.”
Step 4: Position the Cursor in the Footer of the Second Page:
- Scroll down to the second page of your document.
- In the footer area of the second page, click to position your cursor.
Step 5: Insert the Page Number:
- In the “Header & Footer Tools” tab, locate the “Header & Footer” group.
- Click on the “Page Number” icon.
- Choose the desired format for the page number placement in the drop-down menu.
- For example, “Bottom of Page” and “Plain Number 2” or “Current Position” may be options to consider.
Step 6: Customize Page Number Format (Optional):
- If you want to modify the appearance of the page number, right-click on it within the footer.
- Select the “Format Page Numbers” option.
- Customize the appearance, such as font, size, and alignment, in the dialog box that appears.
- Click on “OK” to save the changes.
Step 7: Exit the Footer:
- To exit the footer editing mode, go to the “Close Header and Footer” button in the “Header & Footer Tools” tab.
- The footer will now contain the page number starting from the second page.
Step 8: Save your Document:
- Save your document to preserve the changes made to the page number settings.
Congratulations! You have successfully inserted a page number in the footer starting from the second page in Microsoft Word. By following these steps, you can ensure better organization and navigation of your documents.
Get the best deal on Microsoft Office with the lowest price available on our website today and start boosting your productivity!

