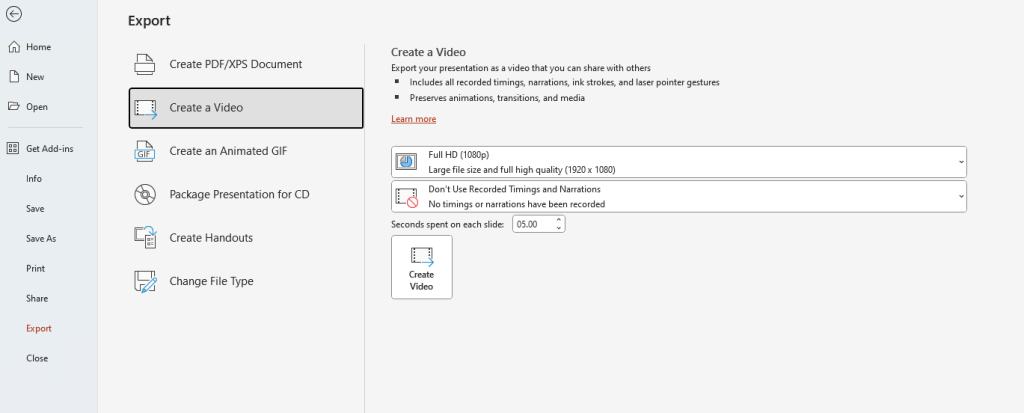
Saving a PowerPoint presentation as a video file can be a useful way to share your presentation with others who may not have PowerPoint installed or to create a video for online platforms. Converting your presentation into a video format allows you to retain the visual elements and animations, making it an engaging and interactive medium for delivering your content. In this guide, we will outline the step-by-step process of saving a PowerPoint presentation as a video file, empowering you to share your presentations in a versatile and accessible format.
By saving your PowerPoint presentation as a video file, you can ensure that your audience can easily view and access your content without the need for specialized software. Whether you want to share your presentation with colleagues, post it on social media, or upload it to a website, converting it into a video format provides a more flexible and widely accessible option.
Step 1: Open PowerPoint
Begin by opening Microsoft PowerPoint on your computer. You can do this by clicking on the PowerPoint icon or searching for “PowerPoint” in the Start menu.
Step 2: Open the Presentation
Open the PowerPoint presentation that you want to save as a video file. You can do this by selecting the “File” tab in the top left corner of the screen and choosing “Open” from the dropdown menu. Locate and select the presentation file on your computer to open it.
Step 3: Navigate to the “File” Tab
In PowerPoint, navigate to the “File” tab located in the top left corner of the screen. This tab contains various options for managing and saving your presentation.
Step 4: Click on “Export” or “Save As”
Under the “File” tab, click on either “Export” or “Save As” from the left-hand menu. The specific option may vary depending on the version of PowerPoint you are using.
Step 5: Choose “Create a Video” or “Save Presentation as Video”
Next, choose the option that allows you to create a video out of your presentation. In older versions of PowerPoint, you may find an option called “Create a Video,” while newer versions may have a “Save Presentation as Video” option. Click on the relevant choice.

Step 6: Customize Video Settings (optional)
You can customize the video settings before saving it. This includes options such as the quality, resolution, and timing of slide transitions. Adjust these settings according to your preferences or leave them as default.
Step 7: Select the Output Location
Choose the output location where you want to save the video file. Browse your computer’s folders and select the desired location.
Step 8: Provide a File Name
Give a file name to your video file. Type in a name that represents your presentation and its content accurately.
Step 9: Choose a Video Format
Select the desired video format for your presentation. PowerPoint offers various formats, including MP4, WMV, and more. Choose the format that best suits your needs and compatibility requirements.
Step 10: Save the Video
Finally, click on the “Save” or “Export” button to save your PowerPoint presentation as a video file. PowerPoint will convert the presentation into a video and save it to the specified location on your computer.
This allows for easy sharing, playback, and distribution of your presentation across different platforms. Enjoy the flexibility and convenience of presenting your slides as a video.
Get your Microsoft Office license at the lowest possible price exclusively on our website.

