Making typographical errors while typing is a common occurrence, especially when working on lengthy documents or in a fast-paced environment. To help users catch and correct such errors efficiently, Microsoft Word offers a valuable feature called AutoCorrect. The AutoCorrect feature in Word plays a crucial role in automatically detecting and correcting common spelling and typing mistakes, saving users time and ensuring the accuracy and professionalism of their written content. In this guide, we will explore the purpose of the AutoCorrect feature in Word, highlighting its benefits and demonstrating how it can enhance the overall writing experience.
The purpose of the AutoCorrect feature in Microsoft Word is to assist users in correcting common typing errors and improving the overall accuracy of their written content. With AutoCorrect enabled, as users type, Word automatically identifies common misspellings, abbreviations, and other errors, immediately replacing them with the correct text. This feature not only saves time by eliminating the need for manual editing but also helps maintain consistency and preserve the intended meaning of the document.
Step 1: Open Microsoft Word
Start by opening Microsoft Word on your computer. Locate the Word icon in the Start menu or search for “Word” in the search bar.
Step 2: Create or Open a Document
Create a new document by selecting “File” from the top menu and choosing “New” from the dropdown menu. Alternatively, open an existing document by selecting “Open” and browsing to the desired file location.
Step 3: Start Typing
Begin typing your text in the document. Let’s say you accidentally misspell common words or frequently make typing errors. The AutoCorrect feature will help you correct these mistakes automatically as you type.
Step 4: Enable AutoCorrect
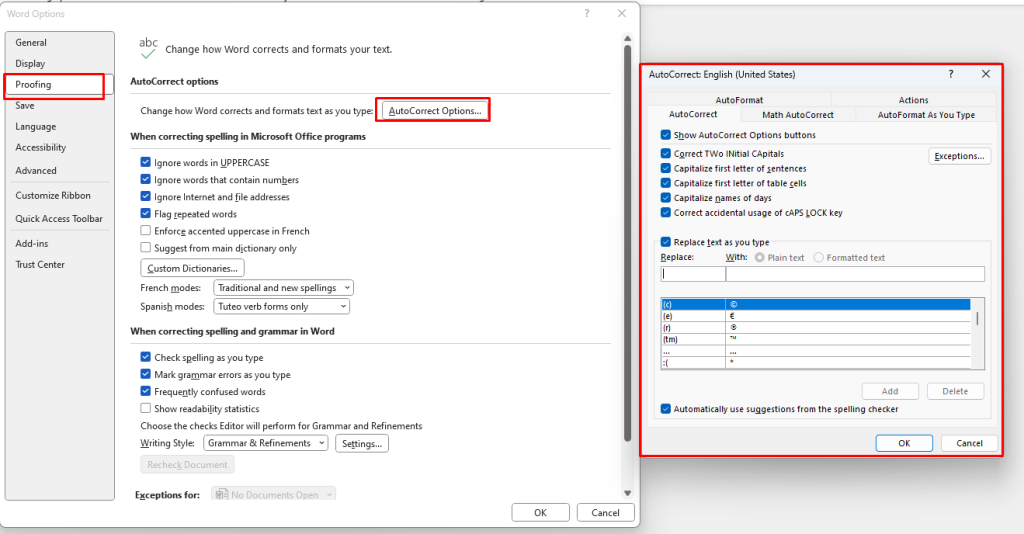
To enable the AutoCorrect feature, go to the “File” tab, select “Options”, and choose “Proofing” from the left-hand sidebar. Click on the “AutoCorrect Options” button to open the AutoCorrect dialog box.

Step 5: Customize AutoCorrect (Optional)
In the AutoCorrect dialog box, you can add, modify, or remove specific AutoCorrect entries according to your preferences. For example, you can set it to automatically replace common typos or abbreviations with the correct words or phrases.
Step 6: Review Existing AutoCorrect Entries (Optional)
Within the AutoCorrect dialog box, you can review the existing AutoCorrect entries by scrolling through the list. This allows you to see which words or phrases are being automatically corrected as you type.
Step 7: Add New AutoCorrect Entries (Optional)
To add a new AutoCorrect entry, select the “Replace” field in the AutoCorrect dialog box and enter the frequently misspelled word or typo you want to correct. Then, enter the correct word or phrase in the “With” field. Click “Add” and then “OK” to save the new AutoCorrect entry.
Step 8: Utilize AutoCorrect in Your Typing
As you continue typing, let the AutoCorrect feature work its magic. If you make a typing mistake or enter a word with a known misspelling, AutoCorrect will automatically replace it with the correct entry you have specified.
Step 9: Edit AutoCorrect Entries (Optional)
If you need to modify or delete an existing AutoCorrect entry, return to the AutoCorrect dialog box by selecting “AutoCorrect Options”. Locate and select the entry you want to edit or remove, then make the necessary changes or click “Delete”.
Step 10: Continue Typing with Confidence
With the AutoCorrect feature actively enabled, you can continue typing with confidence, knowing that common errors, typos, or misspellings will be corrected automatically. This saves you time and effort in proofreading and ensures the accuracy of your writing.
By following these step-by-step instructions, you can harness the power of the AutoCorrect feature in Microsoft Word to improve the accuracy and professionalism of your documents.
Get the power of Microsoft Office at the lowest price on our website, unlocking premium productivity tools for your personal and professional needs.

